How to build a LEGO mosaic? Here's how!
This article is an excerpt from Deep's recently published book, The LEGO Builder's Handbook, a comprehensive guide that explores the core techniques and useful nuances of building with LEGO. Deep's previous work and articles on BrickNerd helped inspire the new handbook, so we're excited to share some of them with you today.
As someone who was able to preview and provide feedback on the book during the writing process, I can say that reading this handbook will help anyone become a better LEGO builder. Deep’s talent for combining technical precision with artistic vision is evident in his work, which can be found at Brick Builder’s Handbook , on his Flickr page , and on Instagram .
Mosaics
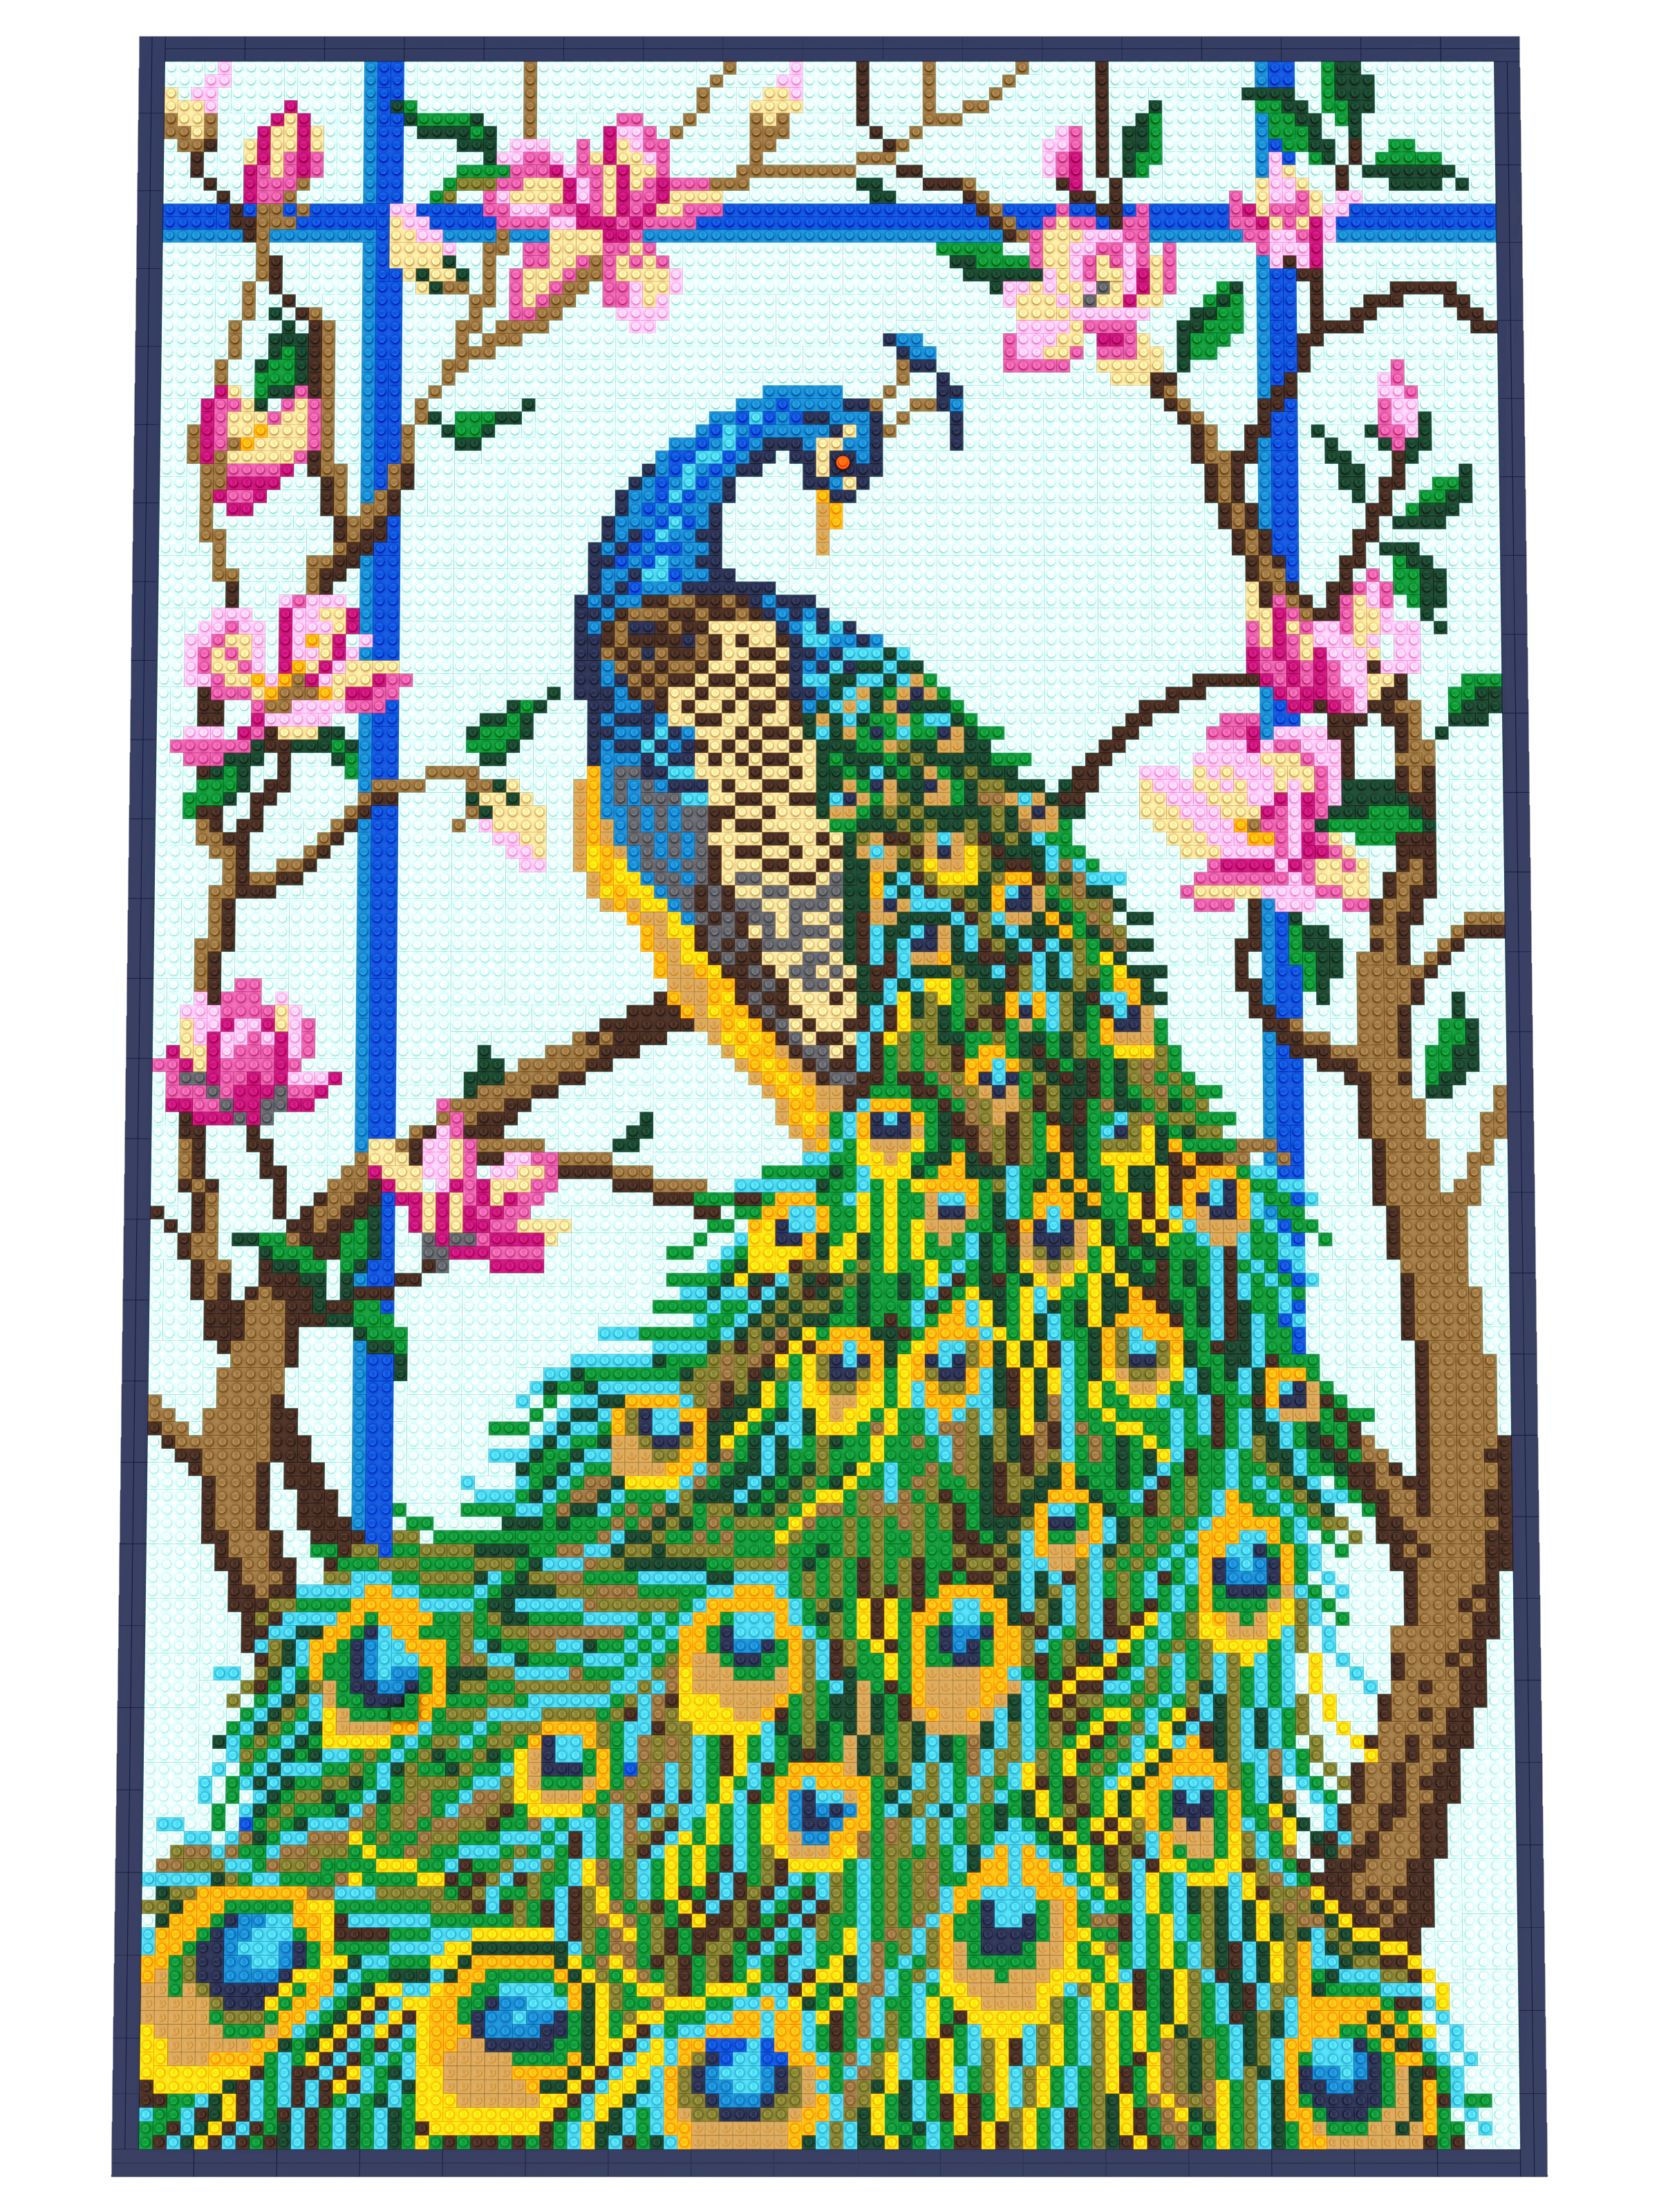
Mosaic by Deepak Shenoy
Mosaics are a traditional art form dating back to ancient times in which an image or pattern is created from an arrangement of small colored tiles, stones, glass fragments, or other materials. As a system of small, colored pieces, LEGO is a natural medium for creating mosaics by arranging bricks, plates, tiles, or other elements in a grid to form a 2D image. It is no wonder then that designing LEGO mosaics is a popular aspect of the hobby.
In this article, we will look at the different types of LEGO mosaics and discuss the steps involved in creating one. Computer programs are often used to assist in the design of a LEGO mosaic. Understanding the techniques that the programs use will help you take advantage of these tools to create realistic, eye-catching results.
From image to mosaic
The typical starting point for most LEGO mosaics is a recognizable image, such as a photograph or painting. The goal is to find a way to translate the content of the image into a grid of LEGO elements in different colors. In the early days of the LEGO hobby, this translation process had to be done manually: the builder would divide the image into a grid and choose the best LEGO color to match each cell of the grid. The precision nature of this work greatly limited the size and complexity of the resulting mosaics. More recently, the advent of digital imaging and modern computers has made it possible for builders to convert any image they wish into a sophisticated LEGO mosaic, with the use of software tools to automate the process.
To see how software can help create a LEGO mosaic, it helps to understand how the data in a digital image file (such as a JPEG, PNG, or BMP file) is organized. An image is essentially a 2D grid of square pixels (short for picture elements), each of which is a specific color. When there are enough pixels, our brains start to blend the pixels together, creating the illusion of a single, continuous image, with light, shadows, shapes, colors, and textures that are similar to what we see in real life.
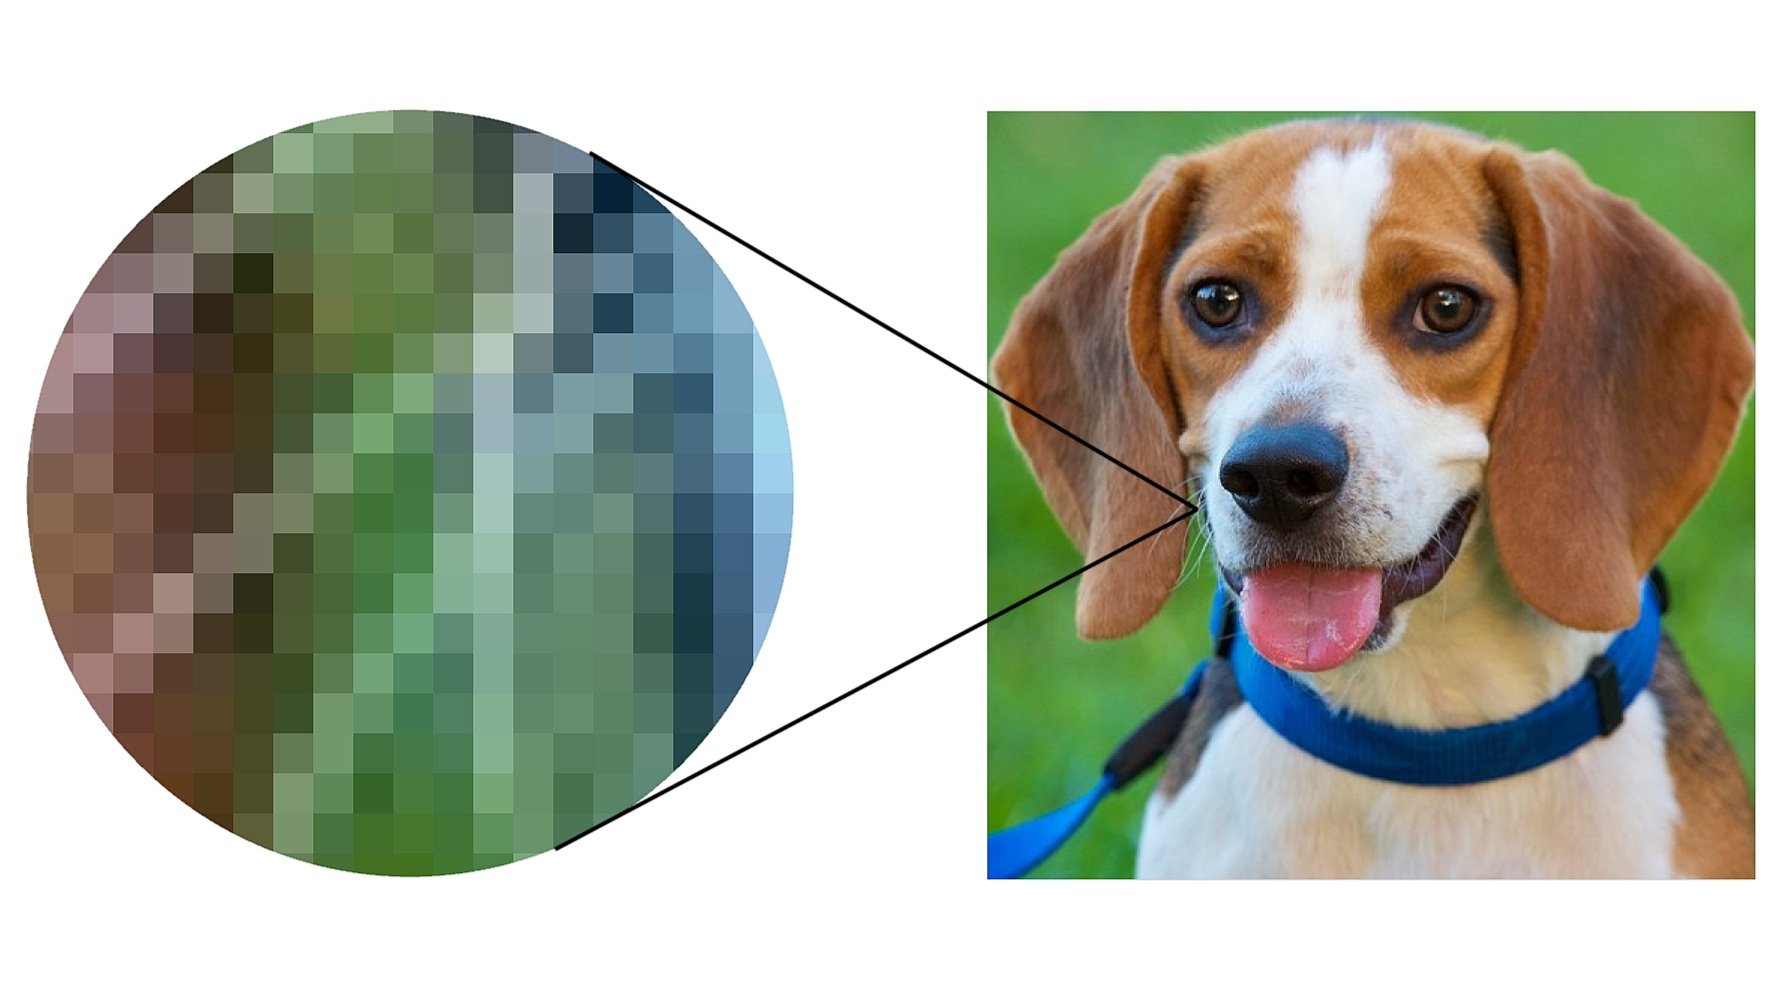
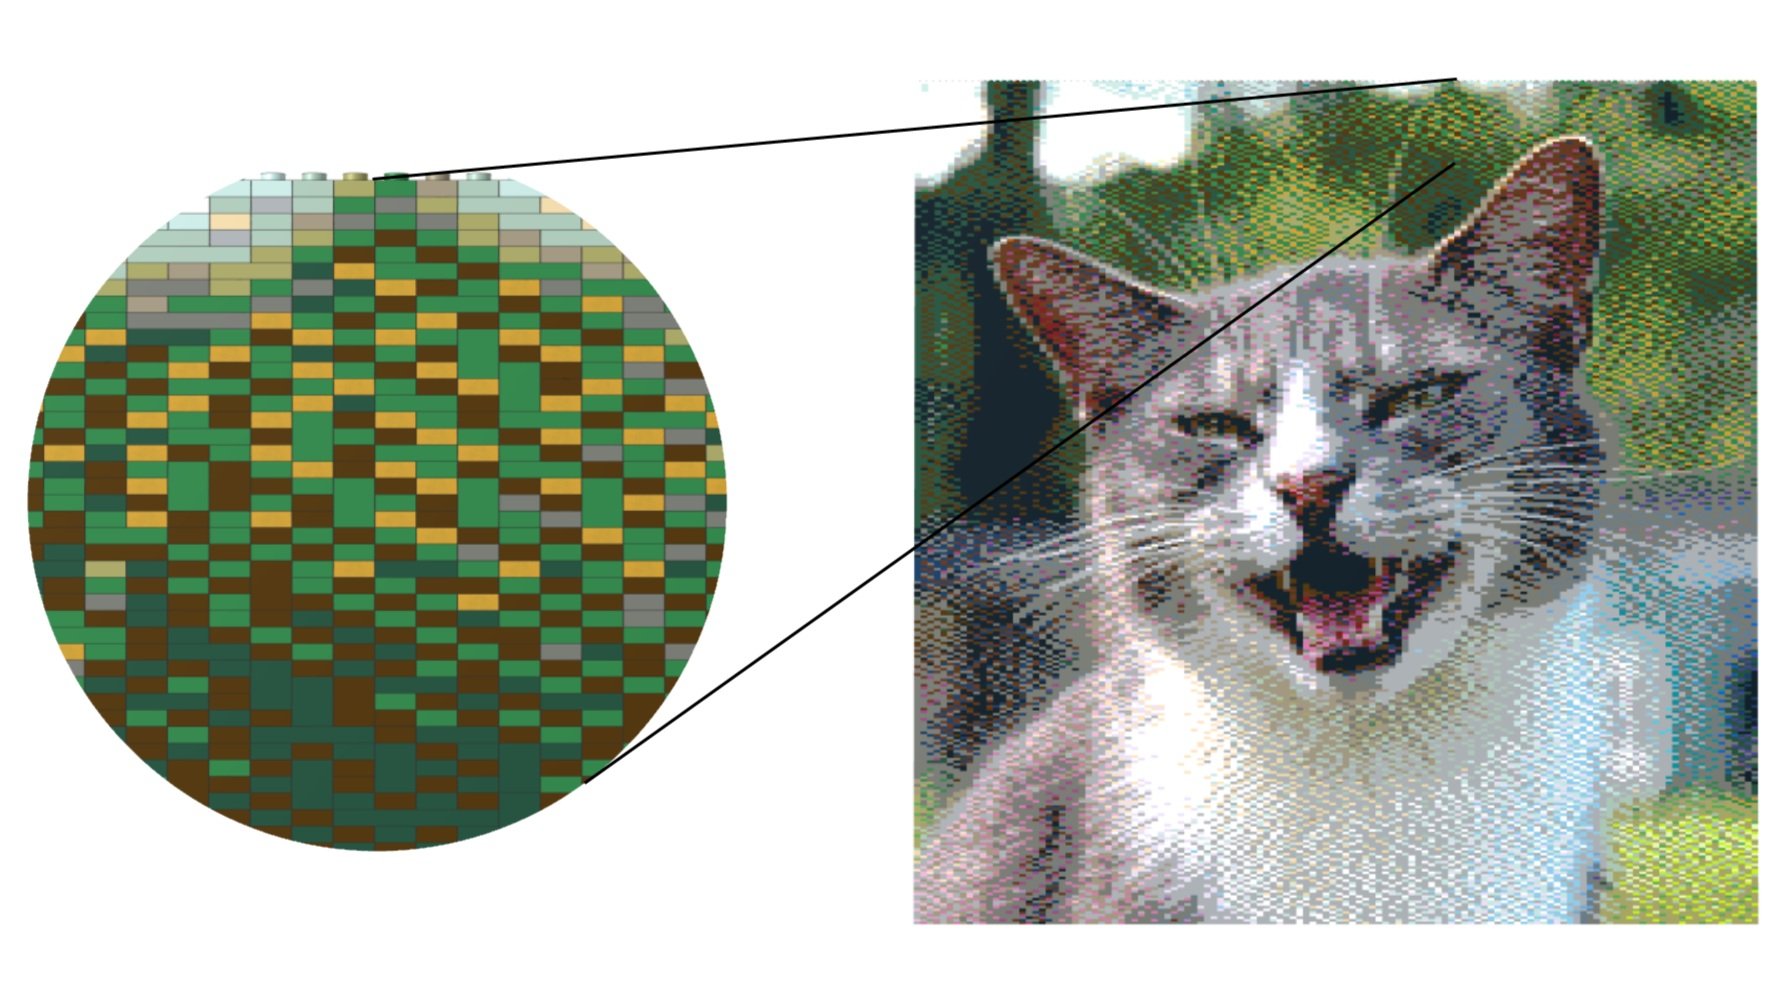
If you zoom in on a digital image, you will see how it is made up of square pixels, each with its own color.
If you think about it, a digital image is already a kind of mosaic: the tiny, colored pixels are analogous to the small bricks or tiles that ancient artists organized into intricate designs. The pixel grid in a digital image is also analogous to the regular square grid of stud locations in the LEGO system. Software makes it easy to bridge the gap between the media, by automatically examining the pixels in an image and selecting the best arrangement of LEGO colors to represent them.
It’s tempting to think that we can simply map each pixel in an image to an individual 1×1 LEGO brick or plate of the appropriate color to create a LEGO mosaic. Unfortunately, it’s not that simple. In fact, a LEGO mosaic can only be a rough approximation of the original image at best. There are two reasons for this: the resolution of the image and the color depth.
Resolution
Resolution is the level of detail captured in a digital image. It is proportional to the number of pixels the image contains: the more pixels the image has, the more detail it can capture. Digital images are typically high enough in resolution that you can’t see the individual pixels that make up the image (unless you zoom in all the way with a photo editing program like Photoshop). There are so many pixels that they all blur together. In contrast, you can usually see the individual tiles that make up a mosaic unless you’re quite far away, so the level of detail captured in a mosaic is typically lower. In short, the size of an individual pixel relative to an entire digital image is much smaller than the size of an individual tile relative to an entire mosaic.
To put this into perspective, let’s look at an example. The first digital cameras from the late 1990s produced images with something like 1,024×768 pixels. This would be considered low resolution today, when resolution is often measured in megapixels (a unit equal to 1 million pixels). Even if we tried to take one of these relatively low-resolution images from the 1990s and translate it pixel-by-pixel into a LEGO mosaic, the result would be unwieldy. Since the smallest element we can use to represent each pixel is a 1×1 brick or slab (with a footprint of 0.8×0.8 cm), we would end up with a LEGO mosaic measuring at least 27×20 feet!
An example of decreasing resolution
Obviously, we need to drastically reduce the resolution (number of pixels) of the source image before we can display it with LEGO. For example, if we were to reduce a 1024×768 image by a factor of 8, we would end up with 128×96 pixels. This would equate to a large (but much more manageable) 40×30 inch LEGO mosaic. However, scaling it down comes with a significant loss of fine detail in the resulting LEGO mosaic. It is also harder to create the illusion of a continuous image, because it is difficult to see the individual pixels that make up a LEGO mosaic. As a result, most LEGO mosaics don’t look very good when viewed up close. You have to step back a few feet to get the desired effect.
Color depth
Color depth is the maximum number of colors a digital image can display. Again, it helps to understand a little about how image file formats work to see how the color depth of an image affects its mosaic. Behind the scenes, an image file is nothing more than a bunch of numbers, each representing one of the image's pixels. In a typical color image, each pixel is represented using three 8-bit binary numbers, one for each of the three primary colors: red, green, and blue. By combining the three primary colors in the correct ratio, we can represent more colors in the color spectrum than humans can actually see. Each bit can have two values (0 or 1), so 8 bits allow us to represent a total of 2^8 = 256 values (0 to 255) for the intensity of each primary color. Add all three colors together and we have a total of 256 × 256 × 256 = 16.7 million possible combinations, each representing a separate color.
LEGO’s color palette has expanded over the years, but the company has yet to produce bricks in 16.7 million different colors. So when creating a LEGO mosaic, we have to consider how to reduce the enormous color depth of a standard digital image to the 40 or so commonly available colors of LEGO elements. As with the resolution problem, this also results in a significant loss of detail. LEGO mosaics cannot fully capture the rich gradations of light, shadow, and color found in most digital images.
An example of color depth in different shapes
LEGO’s narrower color palette also limits the types of images that can be rendered well as a mosaic. Grayscale images or other images that rely on many subtle variations of a small number of colors would be difficult to translate to LEGO. It’s fitting, then, that one of LEGO’s first official mosaic sets aimed at AFOLs was a recreation of Andy Warhol’s famous silkscreen prints of Marilyn Monroe. The pop art style of the original features a pared-down color palette without subtle gradations, perfect for the low-resolution, low-color-depth nature of LEGO mosaics.
While AFOLs have been building LEGO mosaics for a long time, the LEGO Group’s first major venture into mosaics didn’t come until 2020, when the company introduced a new theme called LEGO Art. Unlike the typical set, which features a wide assortment of LEGO elements, the sets released under this theme primarily consist of a large number of 1×1 round plates or tiles in a variety of colors. Once you arrange these 1×1 pieces according to the included instructions, they come together to form 2D portraits of real-life and fictional icons, including Marilyn Monroe, the Beatles, Iron Man, and Darth Vader.
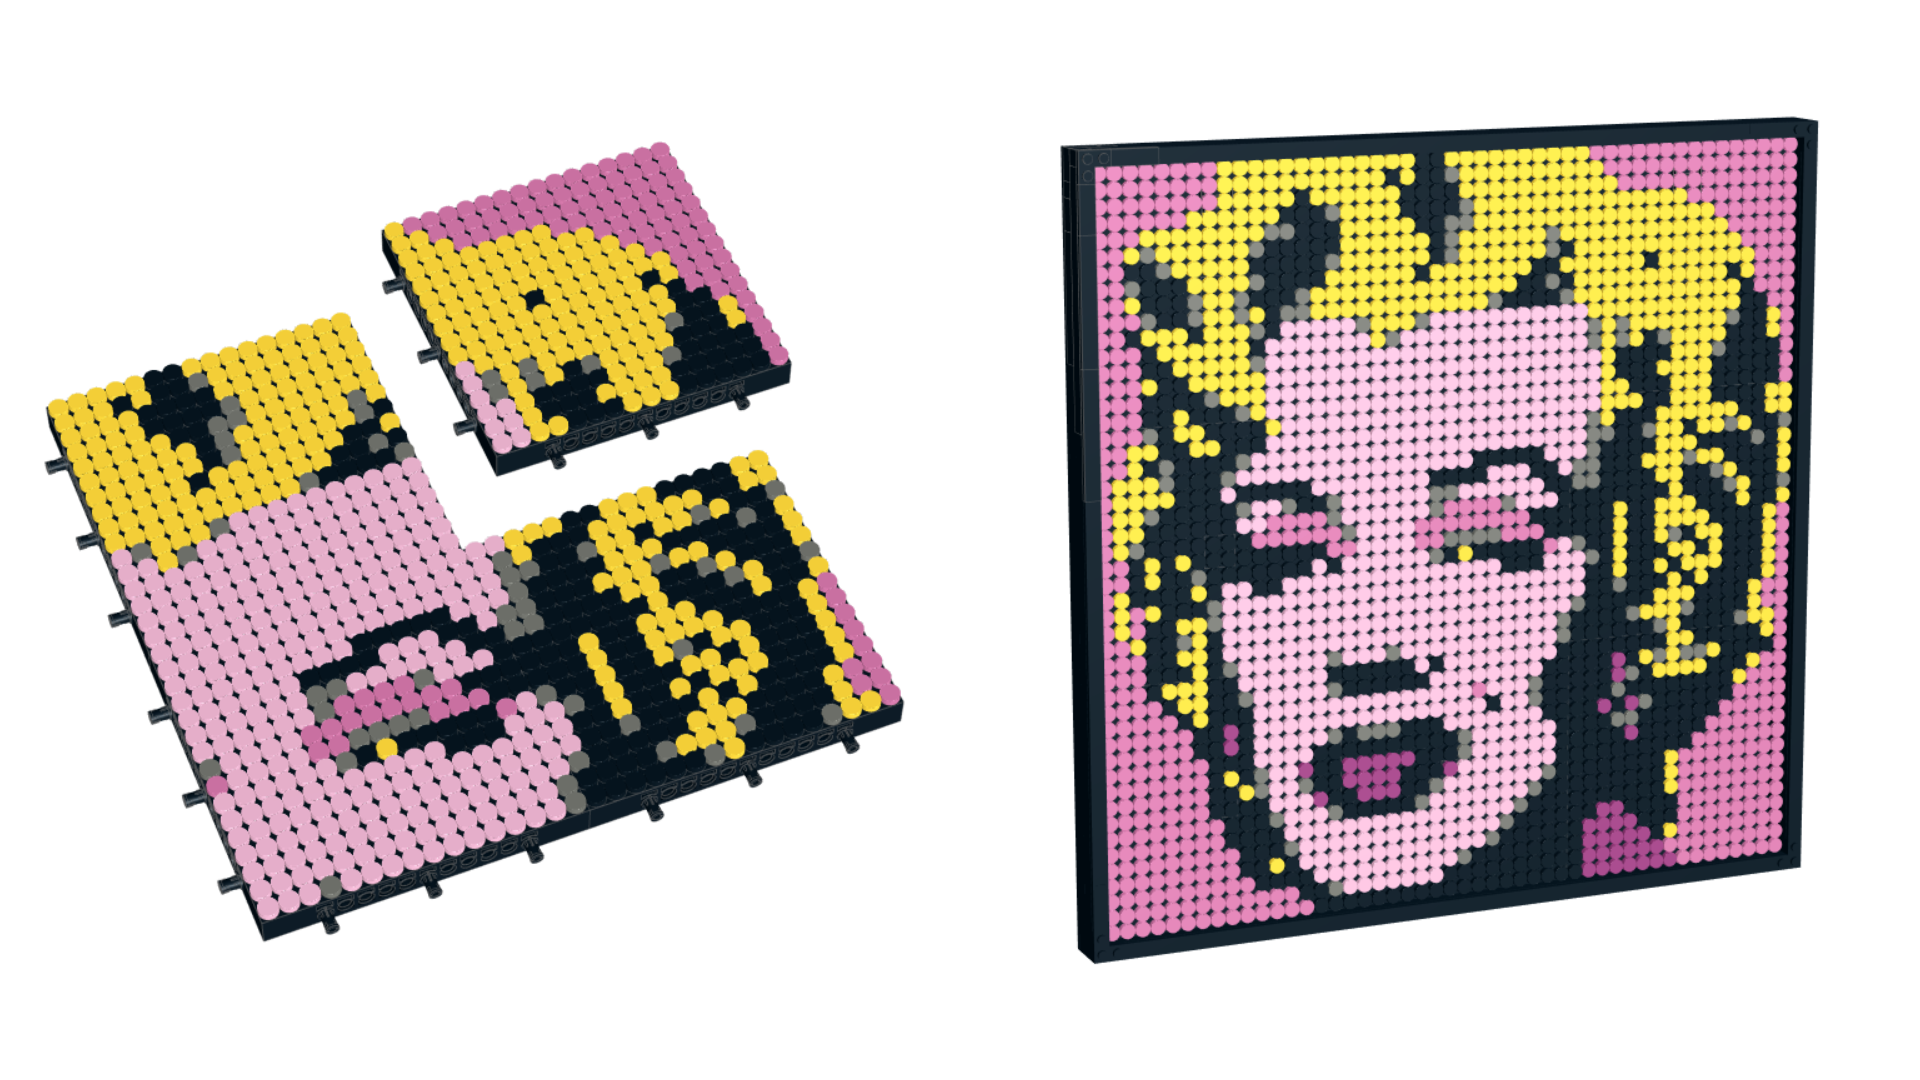
The LEGO Art sets also include 16×16 Technic bricks (#65803) for use as baseplates. While thicker than standard LEGO baseplates, these bricks can be easily attached to each other with Technic pins to create a large, flat surface for attaching the 1×1 elements.
Types of LEGO Mosaics
LEGO mosaics are generally classified by the orientation of the LEGO pieces used to create them, with studs-out and studs-up being the two main types. We'll be looking at these two types, along with lenticular mosaics, a variation on studs-out mosaics that combines two separate images into one mosaic.
STUDS-OUT
Studded mosaics are the most common type of LEGO mosaic. They are created by attaching bricks or plates to a LEGO base plate with their studs facing outward. Each pixel of the scaled-down version of the original image is represented by a 1×1 brick or plate, which happens to have a square footprint, just like a digital pixel.
A studded-out mosaic
One advantage of using regular bricks or tiles is that they can be combined into larger pieces when the tessellation allows, reducing the total part count. For example, if two adjacent pixels are the same color, you can use one 1×2 piece instead of two 1×1 pieces. However, some builders prefer to avoid blocky pixels in their studded tessellations and prefer to use 1×1 round tiles or tiles (as in the LEGO Art sets), at the expense of a higher part count.
Studs-Up
A studded mosaic is made up of many adjacent columns of stones or slabs, stacked with their studs facing upwards. The design is achieved by viewing the mosaic from the side rather than from above, as in a studded mosaic.
Studded mosaic allows you to capture more detail in the same size.
When built with LEGO panels, a studded mosaic can achieve a higher resolution than its studded-out equivalent, packing more detail into the same overall size. This is because a panel is 2.5 times thinner than the normal stud dimension. However, the gain is only in the vertical dimension. Horizontally, each unit in a studded mosaic is still 1 stud wide.
A disadvantage of the studs-up technique is that the "tiles" in the mosaic are rectangular, so they do not perfectly match the square pixels in the original image. In practical terms, studs-up mosaics are also more difficult to build because they are made by stacking layers of plates, rather than by attaching elements to a base plate in a single layer.
The primary unit of a studded mosaic is typically the 1×1 board, though the number of pieces can be optimized by combining like-colored pieces into longer boards within the same layer. (You can also combine three-high stacks of like-sized, like-colored boards into bricks, though some builders may prefer not to mix boards and bricks in a studded mosaic.) Even with these consolidations, you’ll typically end up with many long columns of vertically aligned joints, which can lead to stability issues. The best solution is to make the mosaic 2 studs deep and alternate the orientation of the boards between layers. In odd-numbered layers, use boards that are 2 studs deep. In even-numbered layers, use two rows of boards that are 1 stud deep: a front row that maintains the pattern of the mosaic, and a back row (out of sight) of longer boards to tie everything together.
While studded mosaics are typically built with plates, some may prefer to use bricks only. This results in larger pixels that are still not perfectly square (since a 1×1 LEGO brick is slightly taller than it is wide). With bricks instead of plates, the resolution of a studded mosaic is actually slightly lower than a studded mosaic of the same size.
Lenticular
The image in a lenticular mosaic changes with the viewing angle. This type of mosaic is inspired by a 16th-century invention called tabula scalata (or “turning pictures”), in which two images are divided into vertical strips and printed on different sides of a folded surface, so that one image is visible from one viewing angle and the other image from another angle.
In 2010, Chris Doyle had the idea to reproduce this effect in LEGO using 1×1 cheese slope pieces (#54200). He placed the cheese slopes so that the slopes in alternating columns faced opposite directions (left versus right). This created a zigzag, folded surface, much like the traditional tabula scalata, and allowed for the combination of two different images into one LEGO mosaic: one with the colors of the left-facing cheese slopes, and the other with the colors of the right-facing cheese slopes.
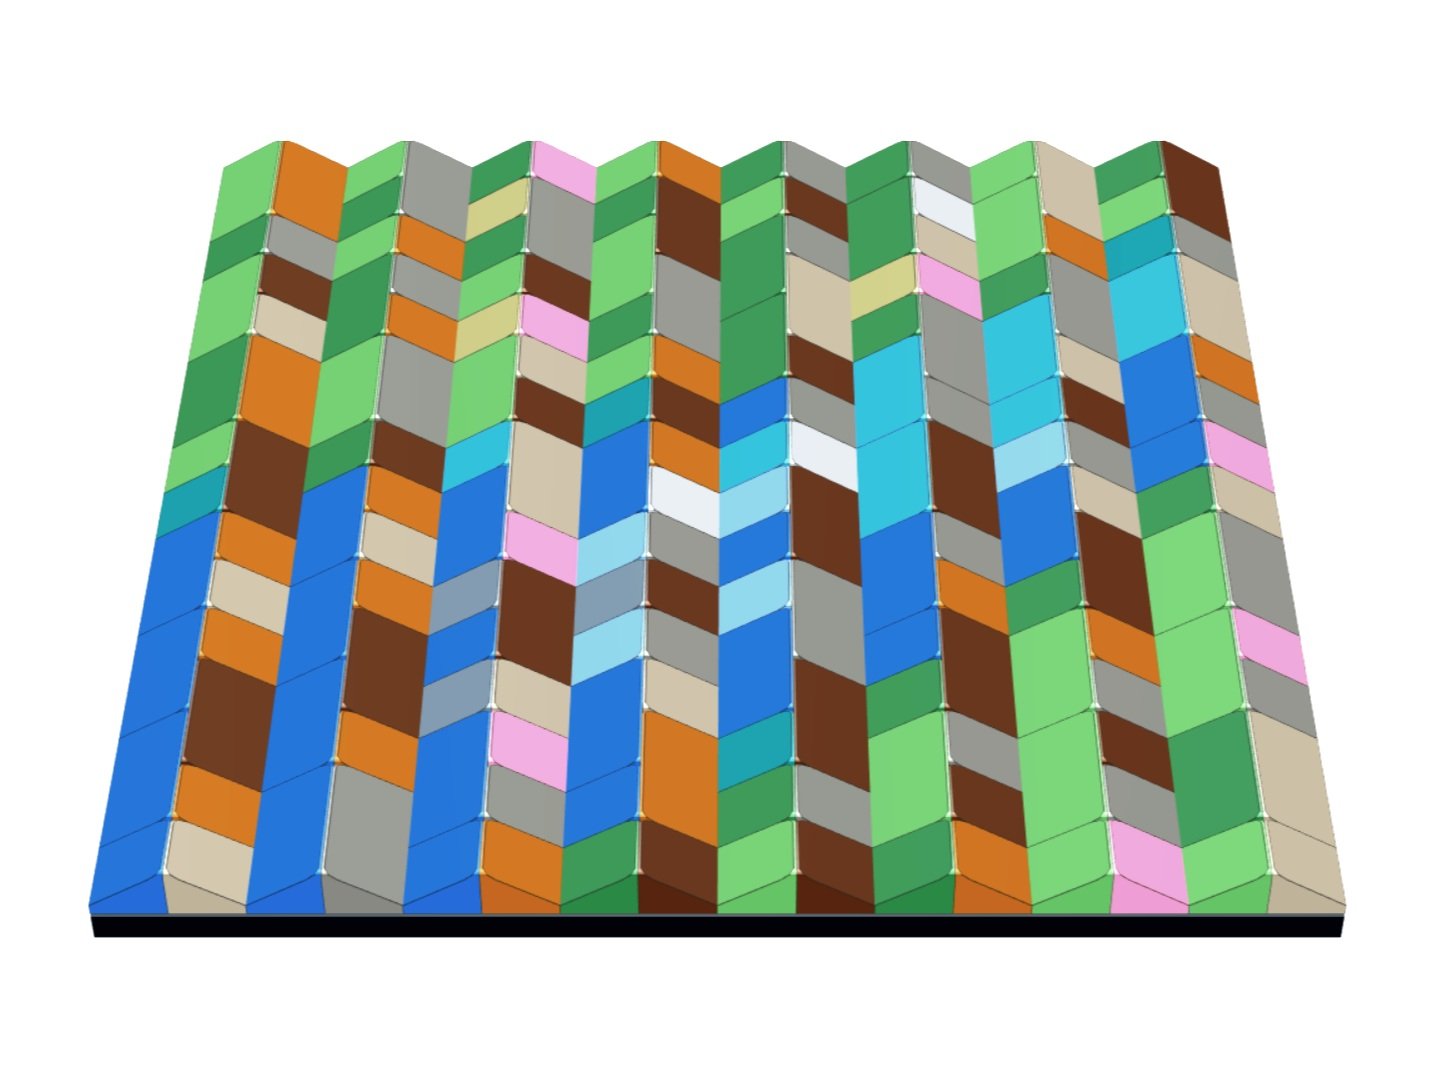
A close-up of part of a lenticular mosaic
This image shows an example of a lenticular mosaic with two different images visible depending on the angle from which the mosaic is viewed.
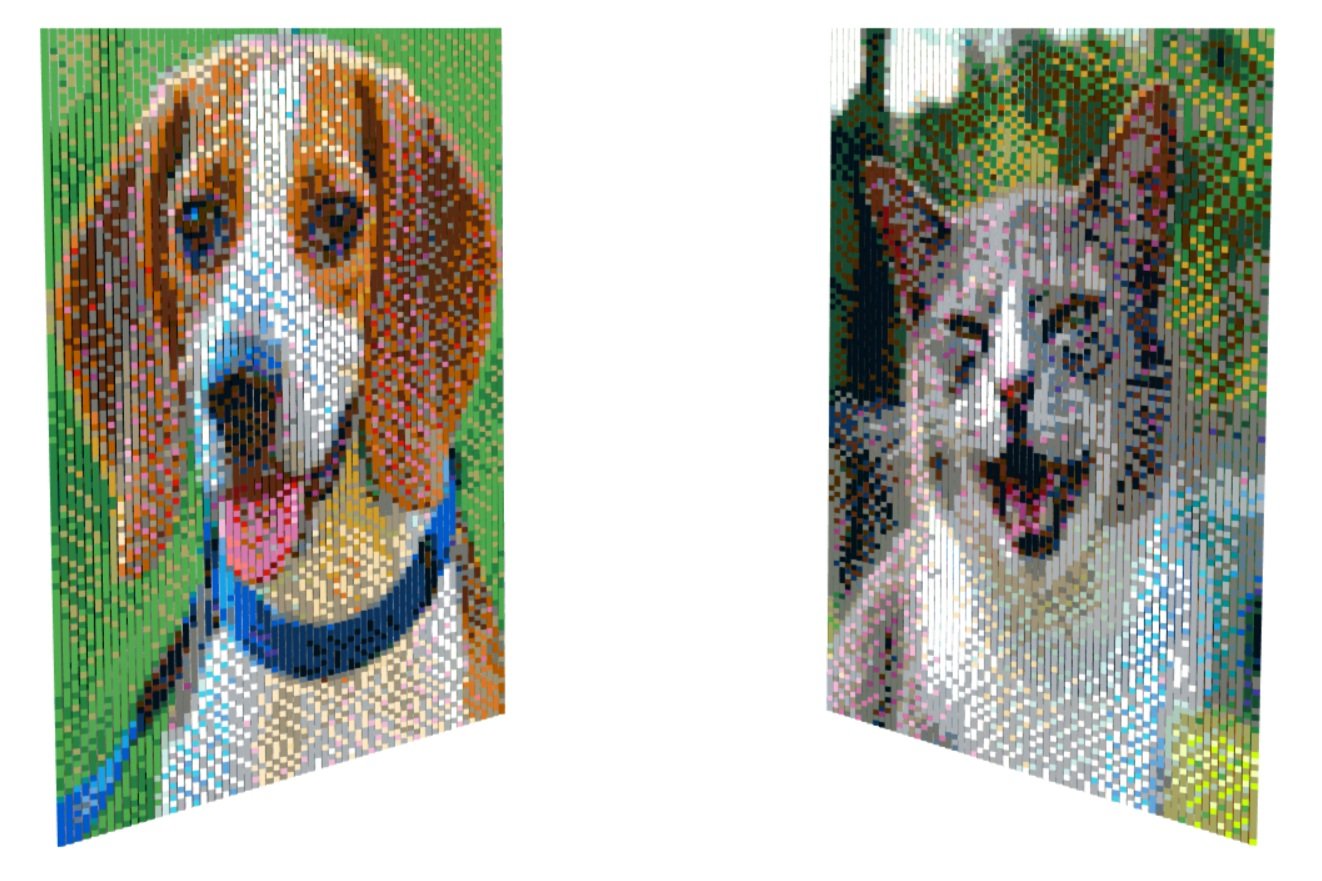
A lenticular mosaic viewed from both angles
Lenticular mosaics can be built in the same manner as studded mosaics, using cheese ramp pieces attached to one or more base plates or 16x16 Technic bricks. If two adjacent 1x1 cheese ramp pieces in the same column are the same color, it is possible to replace them with a single 1x2 ramp piece (#85984) to reduce the piece count.
Other types of mosaics
There are several other types of LEGO mosaics, which are made using one or more specific types of LEGO pieces. These usually depict abstract patterns (geometric or otherwise) rather than more detailed images such as paintings or photographs. They are also usually made by hand rather than using software (except for 3D mosaics, which can use a 2D design created with software as a starting point).
Three-dimensional
The purpose of a 3D mosaic is to add depth to the image or pattern depicted in the mosaic. This is achieved by stacking multiple layers of stones or slabs at certain points in the mosaic. The 3D effect enhances the wave pattern created by the different shades of blue.
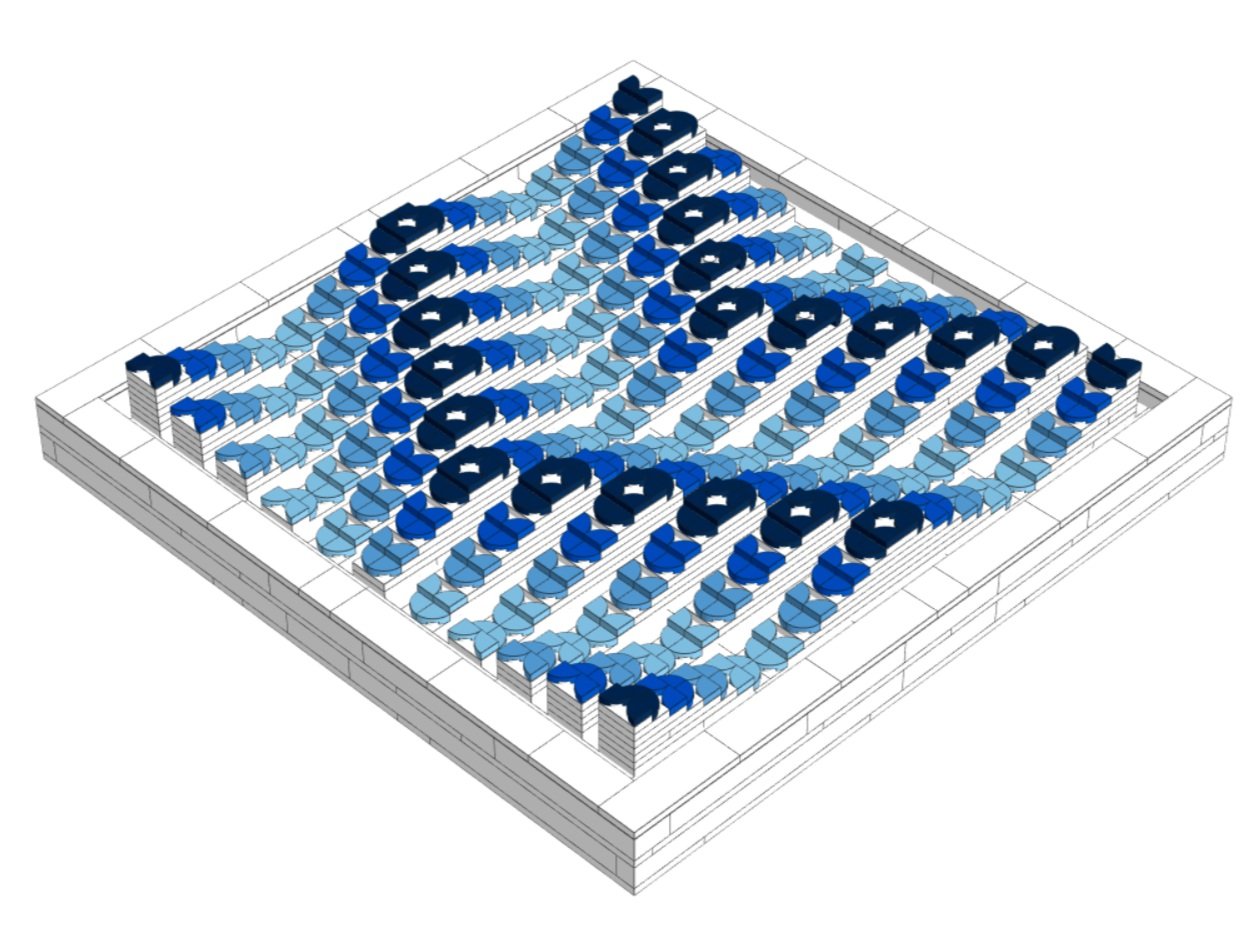
A mosaic by Dana Meyrow with plates stacked at different heights to create depth
It is also possible to create a mosaic using a grid of LEGO elements of an unusual shape instead of regular bricks or plates, such as the minifigure mosaic.
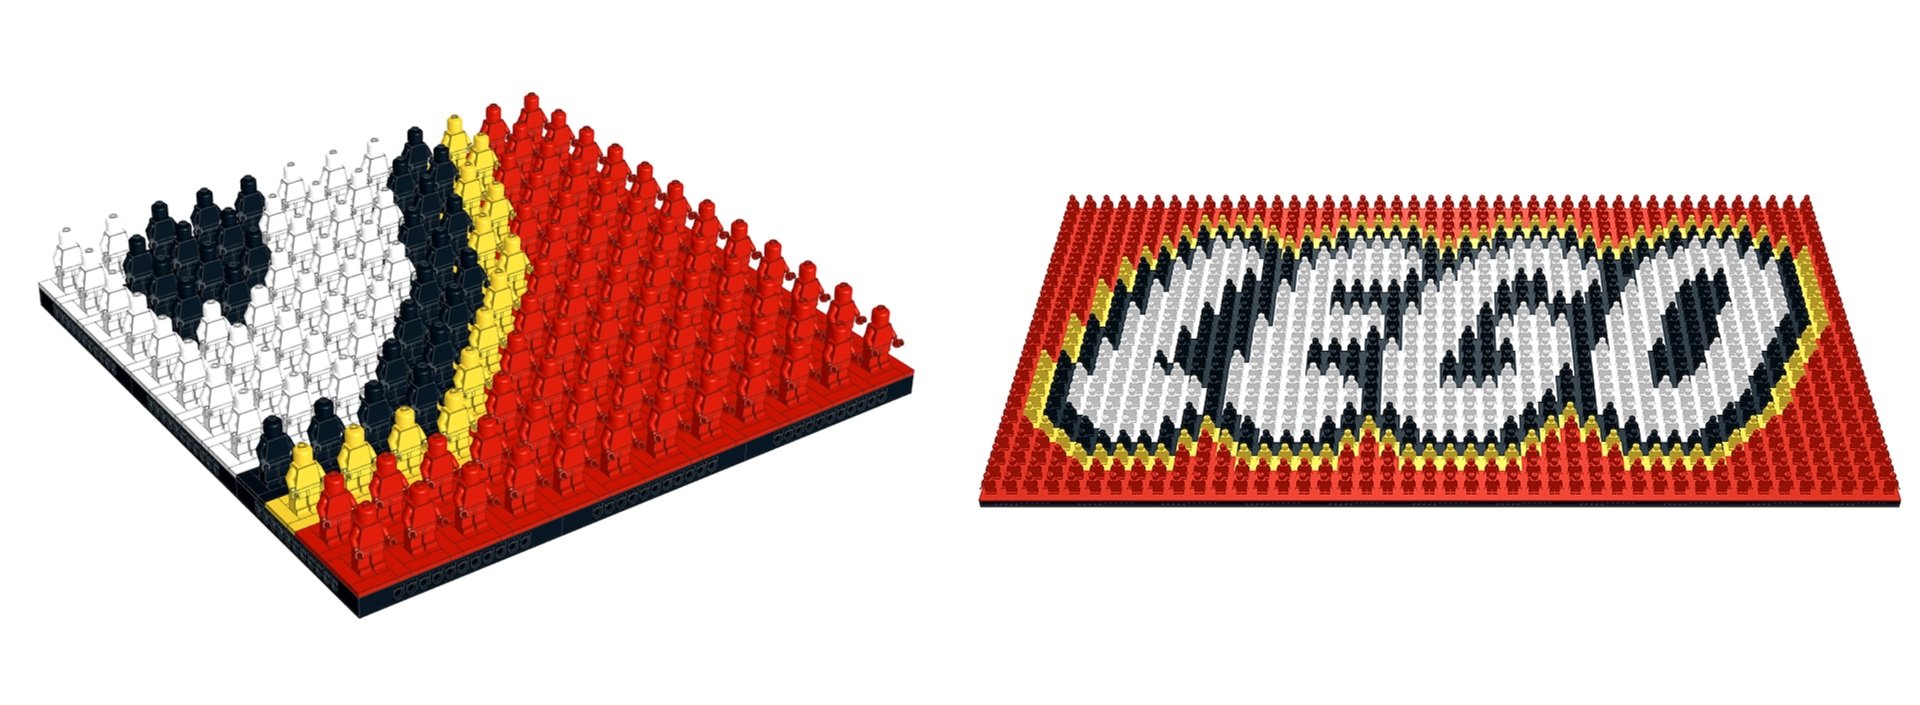
A 3D mosaic made using minifigures
Some LEGO artists even create mosaics that depict a familiar image when viewed from a distance, but upon closer inspection are revealed to be constructed from a seemingly random hodgepodge of LEGO elements, including unusual ones like wheels, gears, and so on. For example, this mosaic created by Gerardo Pontiérr depicts Spanish surrealist artist Salvador Dalí. The variety of elements adds an interesting surface texture to the mosaic. Despite the exotically shaped pieces, however, you’ll notice that the demarcations between one color and another still largely conform to the regular LEGO grid.
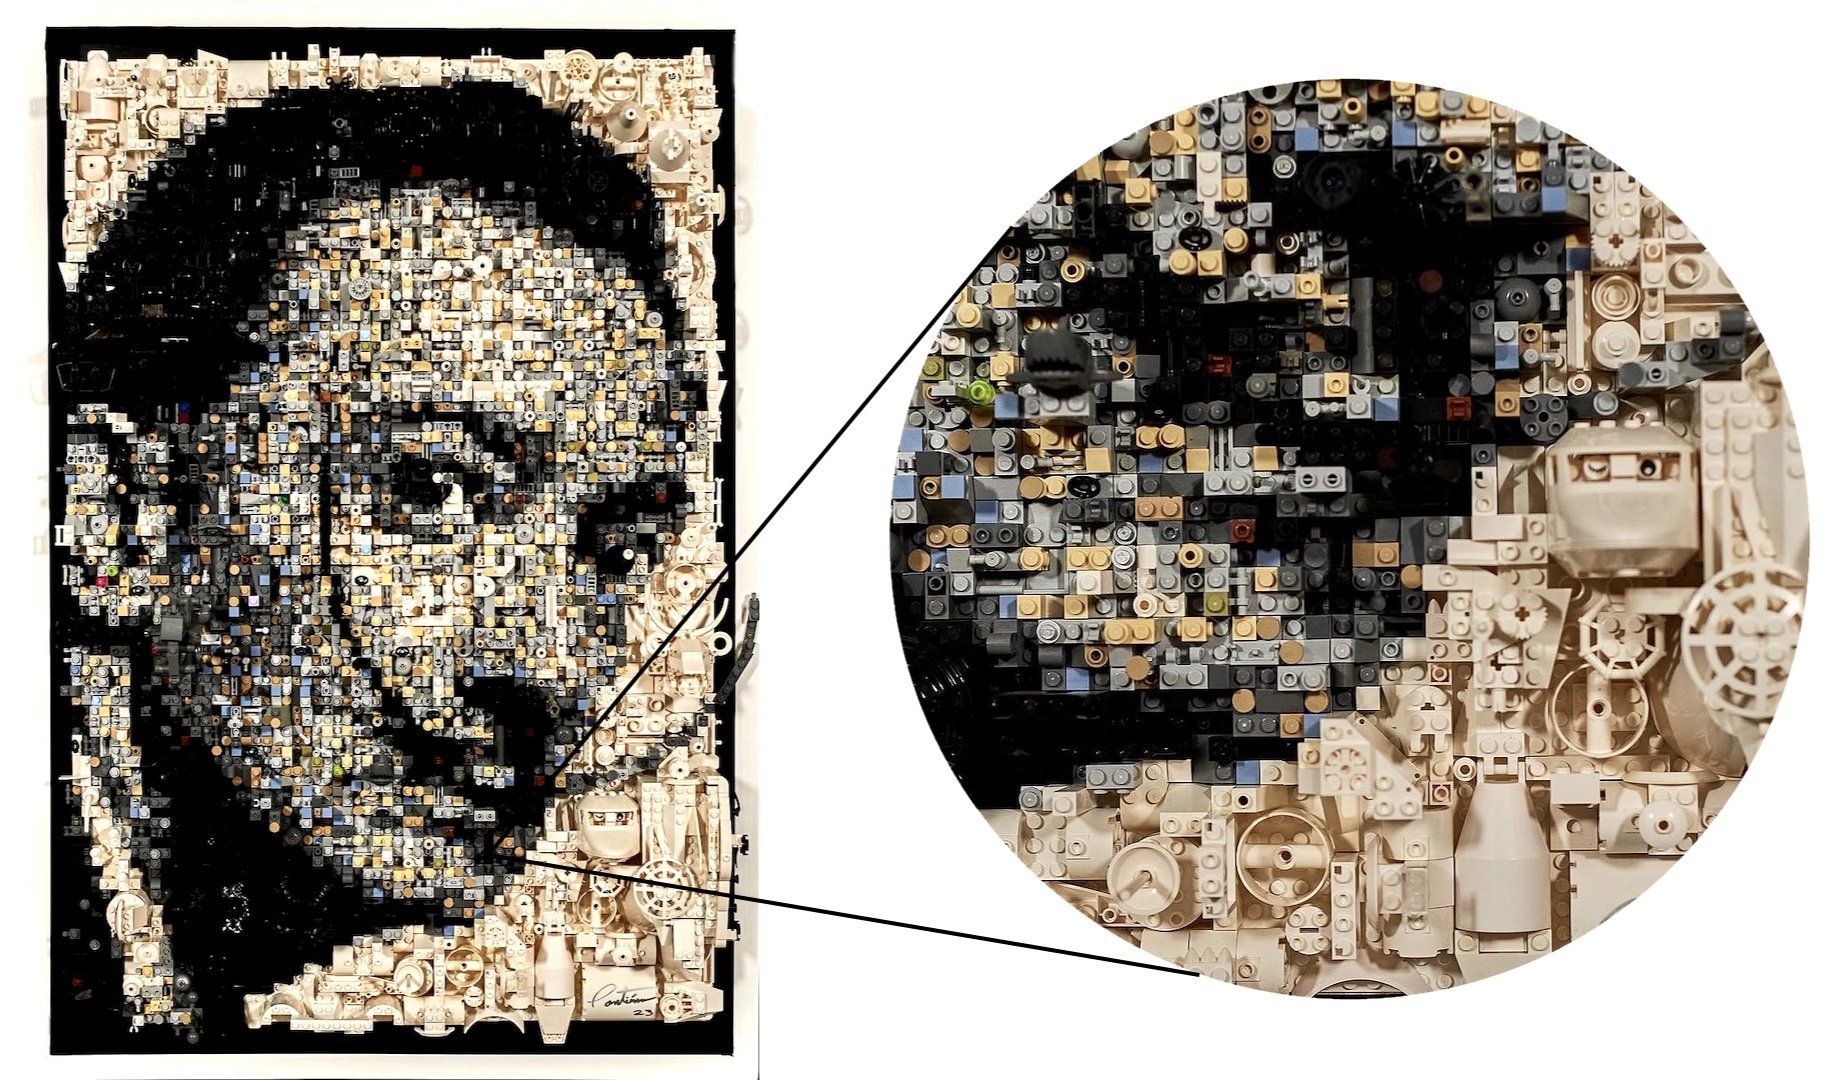
A mosaic of Salvador Dalí made from random LEGO pieces
Isometric
Isometric patterns are designs that do not use the traditional perspective distortion normally seen in a 2D representation of a 3D space. Instead of parallel lines converging at a vanishing point, the parallel lines remain parallel, which can lead to interesting optical illusions.
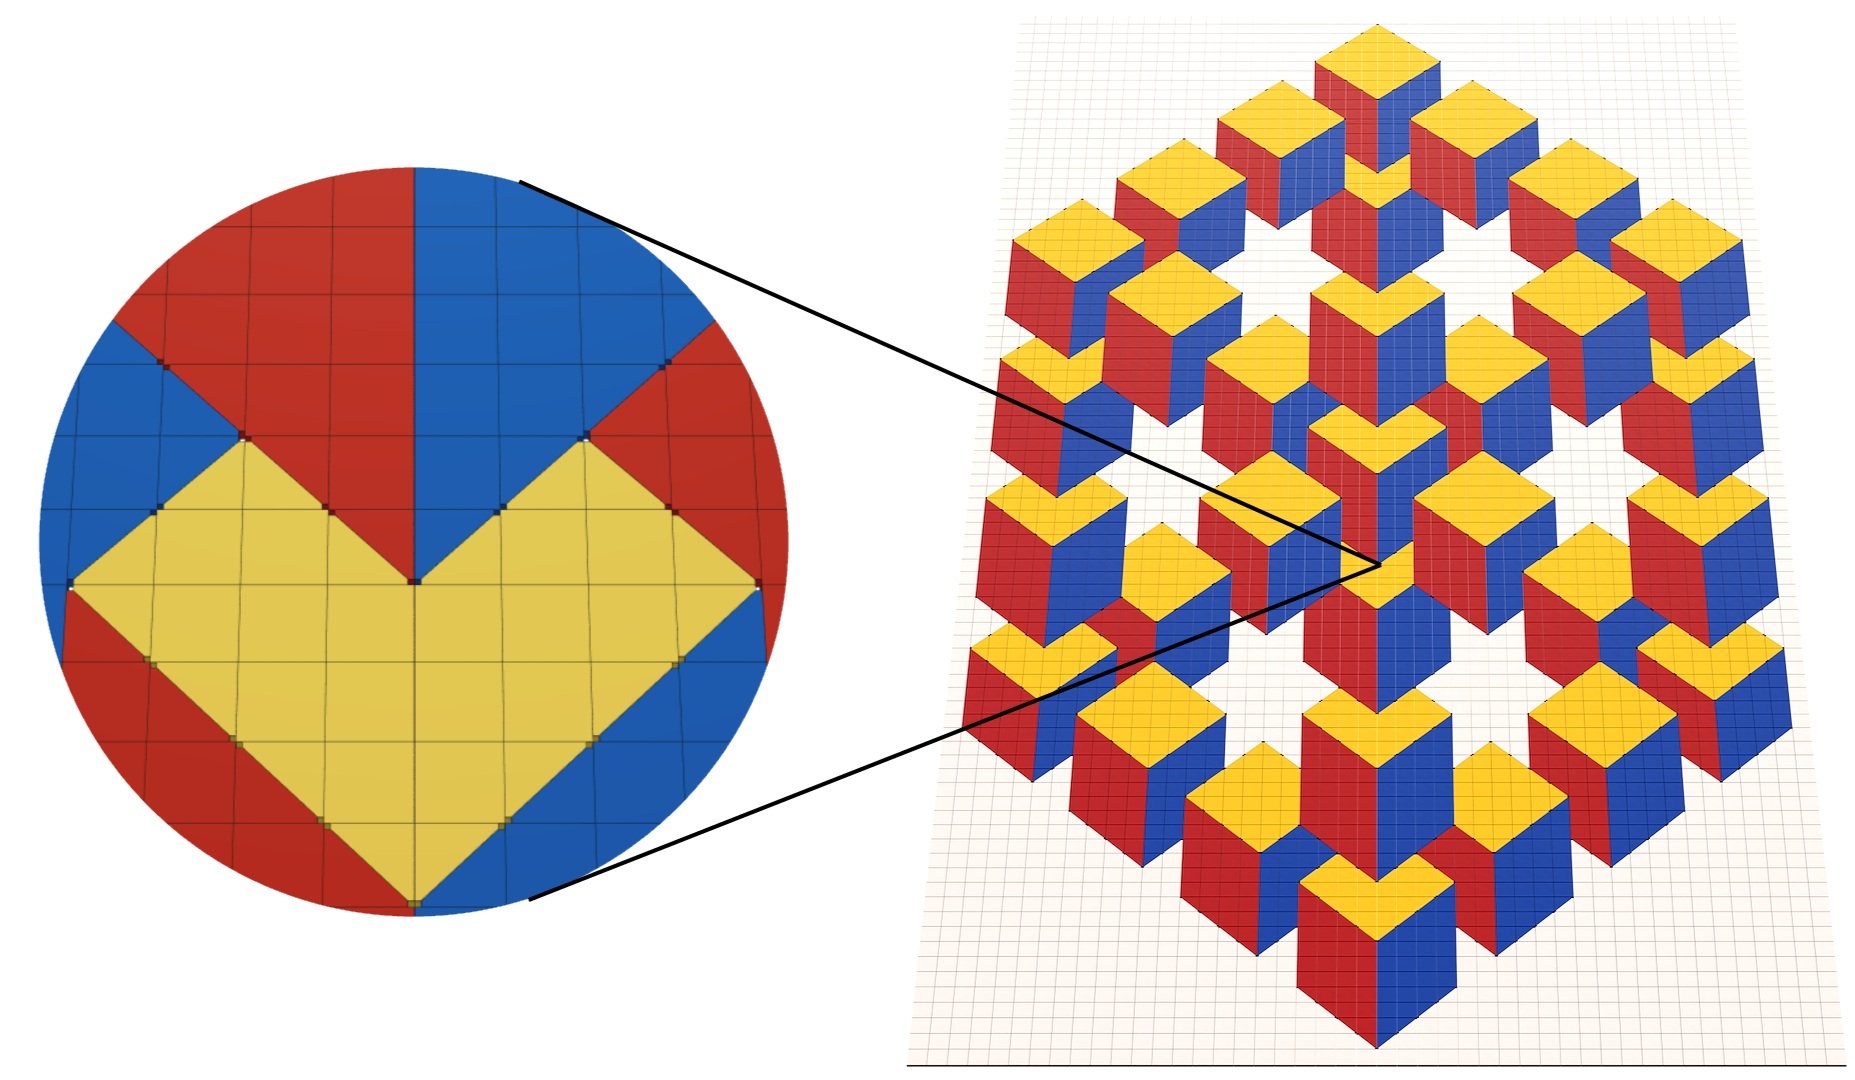
An isometric pattern mosaic
Isometric mosaics became possible with the advent of the 2×2 triangular tile (#35787) in 2018. These elements (used in conjunction with regular 2×2 square tiles) make it easy to create sharp diagonal edges between colors at a consistent angle. The result is an illusion of 3D shapes made up of flat, differently colored planes.
Cheese Slope
Cheesecake tiles aren’t just for creating lenticular mosaics; the unique shape of these elements allows for interesting geometric patterns to be created when laid on their edges, often in conjunction with 1×1 tiles. This style of LEGO mosaic was made popular by builders like Katie Walker.
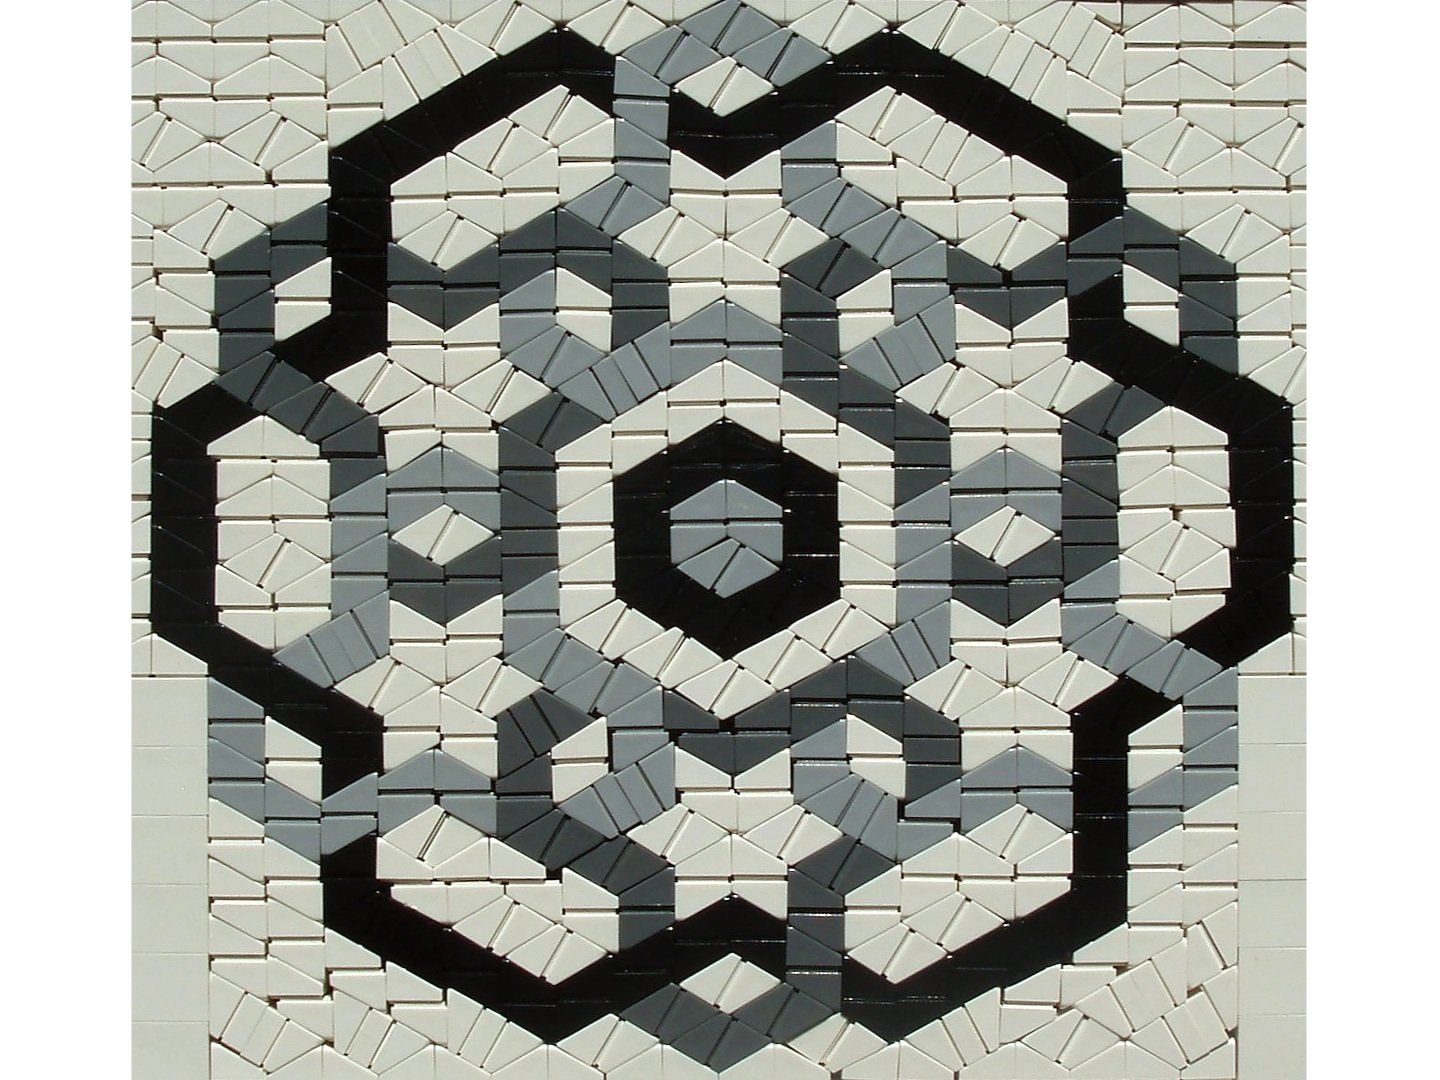
A cheese slope mosaic by Katie Walker
One tricky thing about cheese slope mosaics is that there are no stud connections in the mosaic, so the pieces are not actually attached to anything. Instead, they are simply pressed tightly together and held in place by an outer frame of stones or slabs. This makes mosaics built using this technique very fragile.
Headlight brick
Headlight Stones (#4070) can be connected together in a variety of ways. Headlight Stone Mosaics take advantage of this flexibility to create interesting abstract patterns like this one, inspired by the work of Brendan Powell Smith
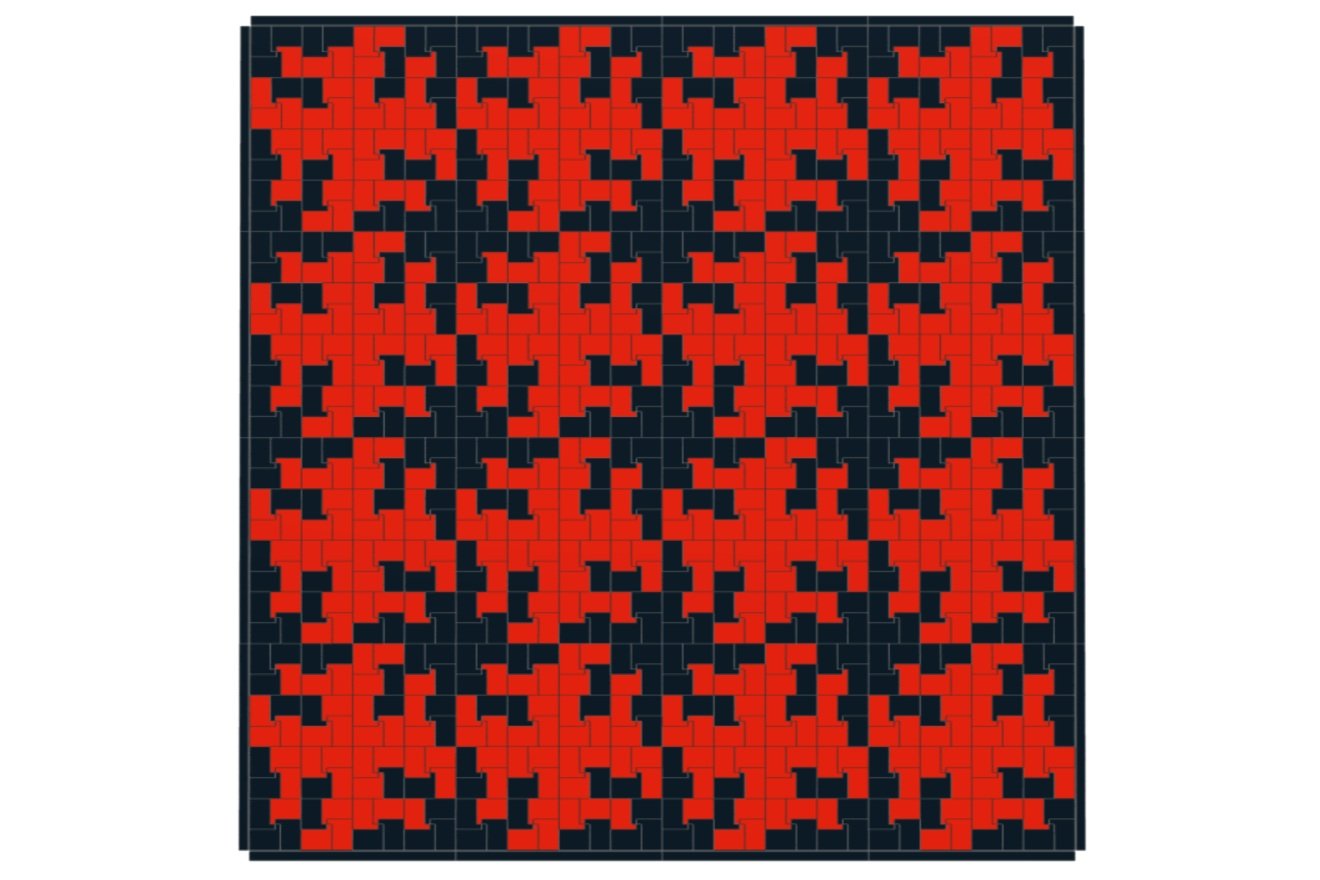
A headlight brick mosaic
Headlight brick mosaics have the advantage of being fully interconnected and do not require a base plate to hold the pieces together. There is also a seemingly endless variety of patterns that can be created with just this one type of LEGO element, especially if you use two or more colors.
Mosaic design software
There are numerous online software tools available to automate the process of creating LEGO mosaics from your own images. Some of these require you to download and install them on your computer, while others offer convenient web interfaces for uploading your images and generating mosaics that are available for near-instant download (as LDraw files or PDFs with instructions on how to assemble the mosaic). Under the hood, all of these programs follow the same basic steps to convert the supplied image into a LEGO mosaic. They differ in the amount of control they give you for adjusting parameters to affect the final design.
BrickLink Studio includes a mosaic tool, although its capabilities are somewhat limited. You can upload an image of your choice and make basic adjustments (cropping level, brightness, contrast, saturation, etc.). You then choose the size of the LEGO mosaic you want to create, as well as the color palette (a subset of the LEGO color palette) and the types of pieces (square bricks, slabs, tiles, or round 1×1 slabs or tiles) you want to use for your studded mosaic. There is also an option to optimize the number of pieces by combining adjacent pieces of the same color into larger pieces (assuming you are not using any round elements).
A much more powerful option is LEGO Art Remix, a web-based program developed by Deb Banerji. LEGO Art Remix is easy to use and includes a wider range of options for controlling each step in the process of turning your image into a LEGO mosaic. In the coming sections, we'll go through these steps as well as some of the advanced settings you might encounter in LEGO Art Remix or other mosaic tools. Not every program gives you insight into the algorithms it uses to perform various steps, let alone the ability to choose which algorithms to use, like LEGO Art Remix does. Understanding the steps the program goes through behind the scenes can help you make informed decisions when designing your own mosaics.
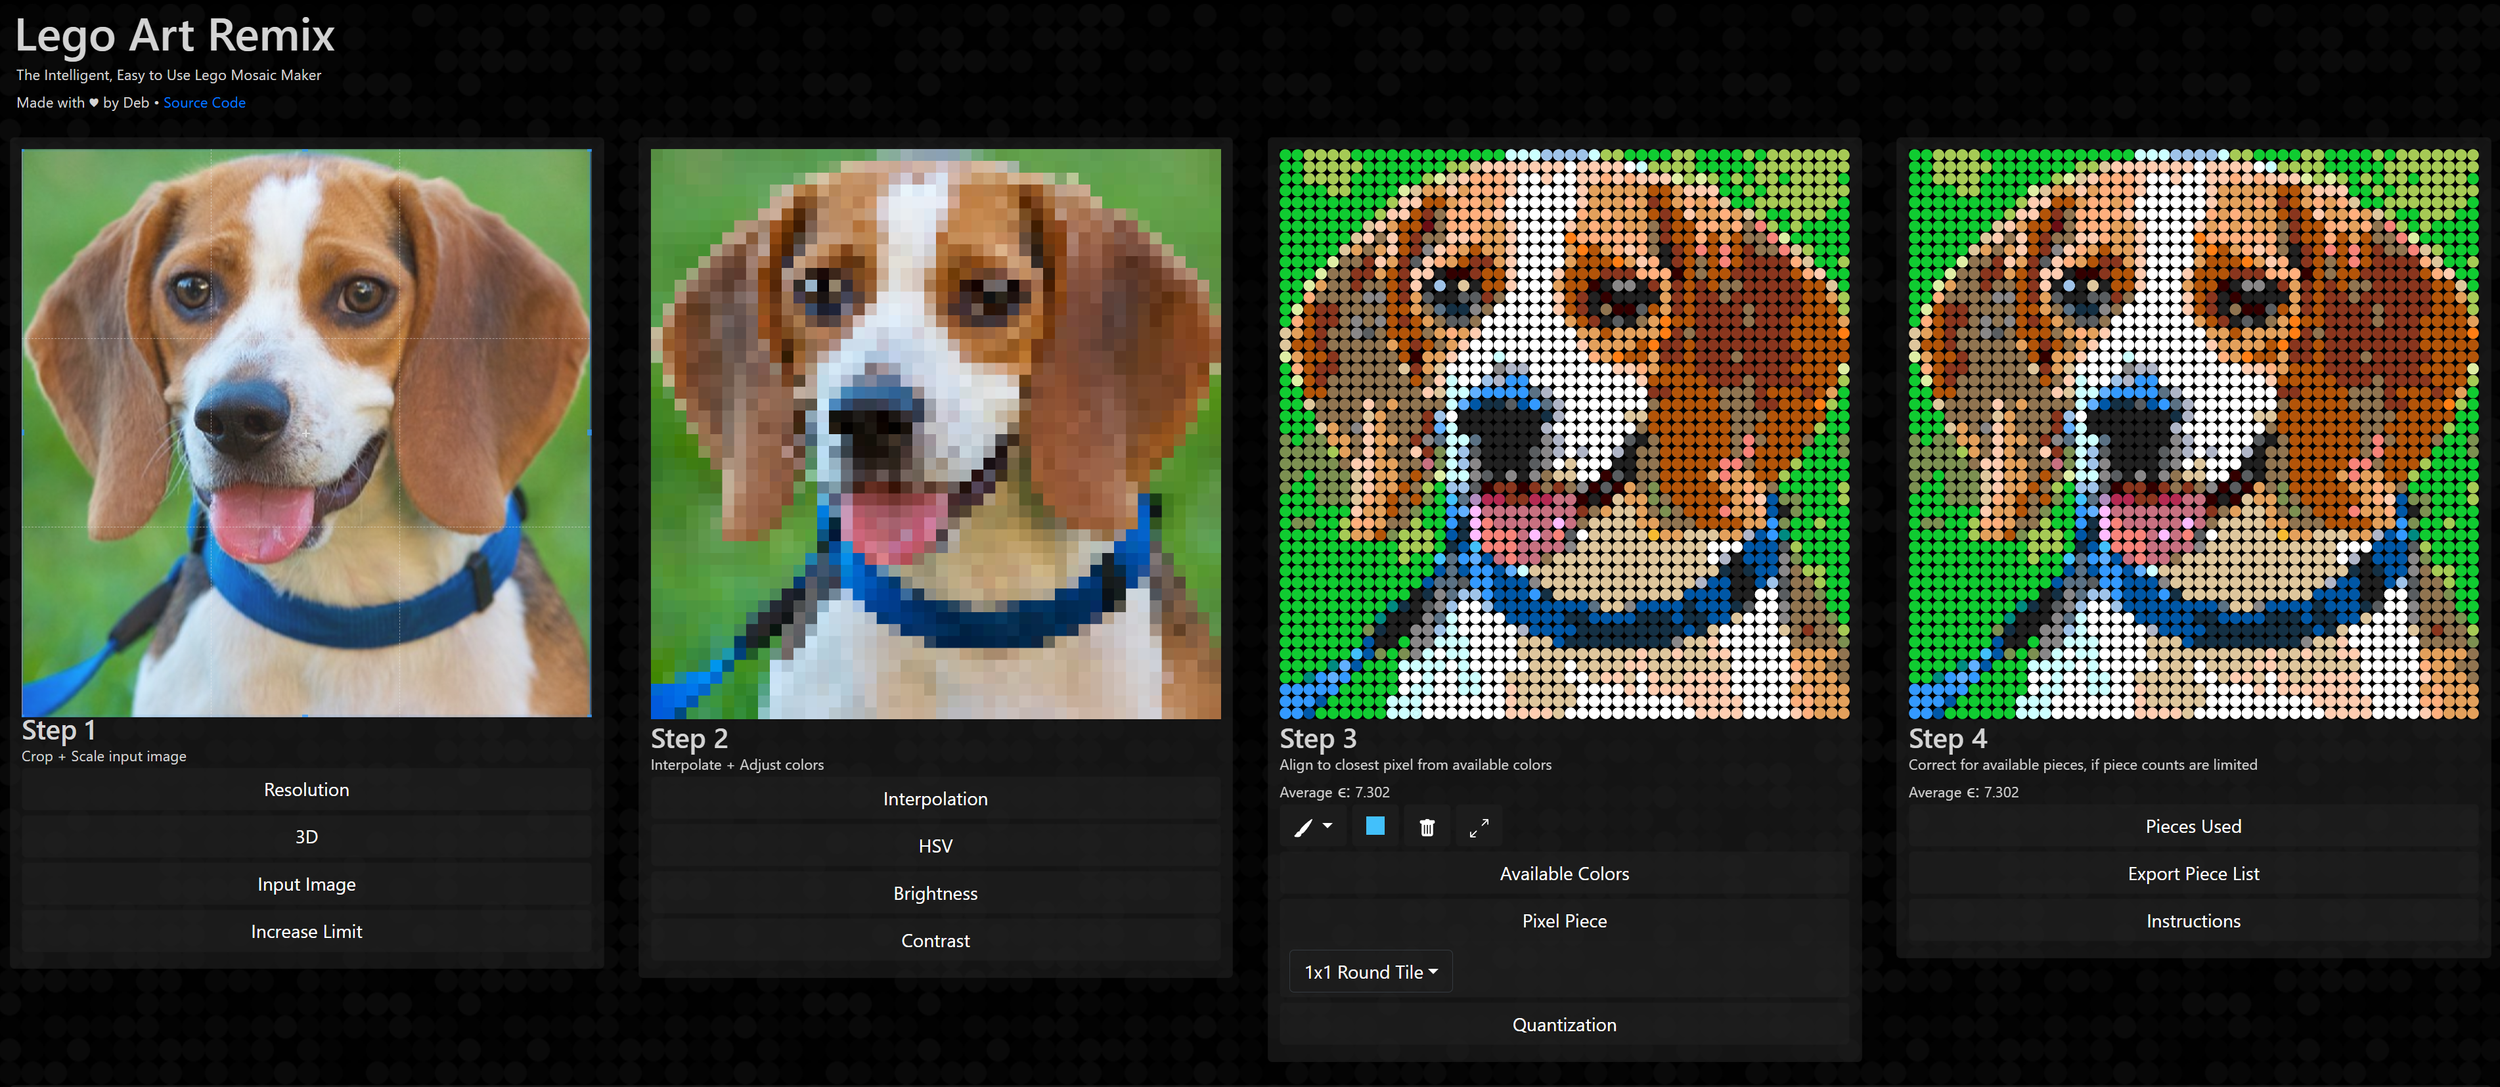
Step 1: Upload the image and set the size
The first step in creating a mosaic is to choose an image and upload it to the software you are using. Of all the steps in the process, this one may require the most consideration, as not every image will make a good LEGO mosaic. For example, images that are too dark or have too much fine detail are not good candidates. Even images that work well may need some fine-tuning in step 3.
Once you upload an image, you will need to choose a size (in terms of studs) for your mosaic. This will affect the number of pieces and the cost of building the mosaic with real pieces. You will also need to consider how the stud dimensions translate to real dimensions. Remember that 1 stud is equal to 0.8 cm.
Step 2: Selecting the palette
Normally the next step is to choose the palette of LEGO pieces that will be used to create the mosaic, both the color palette and the type of pieces. You can use any of the basic LEGO elements (bricks, plates or tiles). You can also choose round or square elements, but remember that round 1×1 pieces cannot be consolidated into larger elements to reduce the number of parts.
Some programs allow you to use checkboxes to select the colors you want to use from the LEGO palette, allowing you to exclude colors you don’t have or that are more expensive or difficult to find. LEGO Art Remix also has a great feature that allows you to limit your mosaic to pieces that can be found in one or more official LEGO Art mosaic sets. That way, if you already have the official sets, you don’t have to order additional pieces to build your mosaic.
Step 3: Prepare the image
The next step is to prepare the image, optimizing it for conversion into a LEGO mosaic. Some of the basic settings include brightness, contrast, and saturation, and the software you're using should have slider controls that allow you to adjust them to your liking. It may help to turn up the brightness on a darker image, increase the contrast if the image has subtle color gradations, or punch up the saturation a bit to achieve optimal results.
Another important part of this step is resizing your image so its dimensions in pixels match your desired mosaic dimensions in studs. If the aspect ratio of the image is different from that of your mosaic, the image will also have to be cropped so the resizing process doesn't distort the image. The software will usually have controls that allow you to set the cropping area using your mouse.
The actual resizing happens under the hood of the software, but it’s instructive to see how resizing can work for the different types of mosaics we’ve covered. Let’s say you want your LEGO mosaic to be 128 studs wide and 128 studs high (which is about 40 inches on a side). The image needs to be resized to 128×128 pixels, at least in the case of a studs-out mosaic.
Resizing is a bit trickier for studs-up and lenticular mosaics. The pixels in studs-up mosaics are rectangular, so we can fit more (2.5 to be exact) into 1 stud dimension vertically. The image needs to be resized to 128 pixels wide by 320 pixels high, since 128×2.5 = 320. This is a case where the aspect ratio of the image intentionally does not match the aspect ratio of the final mosaic, but when you build the mosaic using 1×1 slab sides (which are much wider than they are high), it will end up with the correct proportions.
For lenticular mosaics, two different images need to be combined within the total width of the mosaic. Each image needs to be resized to be half the width but the full height (in pixels) of the finished mosaic, which in our example would be 64 pixels wide by 128 pixels high. Once the columns of the two images are interleaved, the mosaic will have a total size of 128×128 pixels.
Step 4: Quantifying the colors
The next step, color quantization, is the process of reducing the color depth of an image, that is, reducing the number of different colors used. This is an important step in creating a LEGO mosaic: it takes you from an image with potentially millions of different colors to an image with only the 40 or so colors in the LEGO palette. The method used for this step has a major impact on how closely the LEGO mosaic resembles the original image. We'll look at two concepts related to color quantization that you may encounter when using mosaic tools like LEGO Art Remix: color spacing and dithering.
Color distance
Color distance is a measure of how well one color matches another color during the quantization process. We've discussed that digital image files typically treat pixels as three values, each ranging from 0 to 255, representing the levels of the three primary colors (red, green, and blue). Imagine using those three values as coordinates for a point in three-dimensional (3D) space. The colors available in the LEGO palette can also be expressed as RGB values and considered as points in the same RGB color space. By considering colors spatially in this way, we can examine the distance between them to find the best match.
The simplest (and least computationally intensive) way to find the distance between two colors in RGB color space is to calculate the Euclidean distance, the length of the straight line connecting the two points in RGB space. Basic quantization looks at the color of each pixel in the original image and finds the spatial nearest neighbor (based on Euclidean distance) of the colors in the more limited palette. This is the method used by most mosaickers.
Unfortunately, the RGB method doesn’t always match the way humans perceive color correspondences. Programs like LEGO Art Remix give you the ability to use other, more computationally intensive techniques that can result in better color accuracy in your mosaic. This involves mapping all of the colors in RGB space to an alternative color space known as the Lab color space, which is designed to better represent the way humans perceive color. Lab is a 3D space where L, or luminosity, is an achromatic component representing shades of gray, and the a and b components represent ratios of four primary colors (red, green, blue, and yellow).
Even within Lab space, there are different ways to find the closest color match. With LEGO Art Remix, you can either use the Euclidean distance within Lab space, which is less accurate but faster, or the Delta-E function (listed as CIEDE2000), which is the most accurate way to calculate the distance between two colors in Lab space. Try switching between these different options and see how the results vary.
Dithering
Another option that can be enabled in LEGO Art Remix is a technique called dithering, which can somewhat alleviate the loss of color depth due to color quantization. Dithering involves grouping pixels of different colors together in such a way that they collectively mimic the colors of other colors. This technique allows you to use a limited color palette (in this case, the LEGO color palette) to represent a wider range of colors. LEGO Art Remix offers a variety of dithering algorithms for you to experiment with. We won’t focus on the nuances here, but rather provide a general overview of how dithering works and how it can help you create better LEGO mosaics.
Historically, dithering was used in early computer displays that had very limited color palettes. To this day, inkjet printers use halftoning, a form of dithering where single-color dots of varying sizes and spacing simulate a smooth color transition. We can apply the same technique to LEGO. For example, this image shows five different patterns created by arranging four 1×1 plates in two possible colors: black and white. The ratio of black increases as we move from left to right.

Five patterns with increasing amounts of black (left to right)
Now imagine a large mosaic made by tiling these five patterns into five separate strips. Notice that the three strips in the middle appear to be increasingly darker shades of gray, at least when viewed from a distance. Squinting a little can also help.
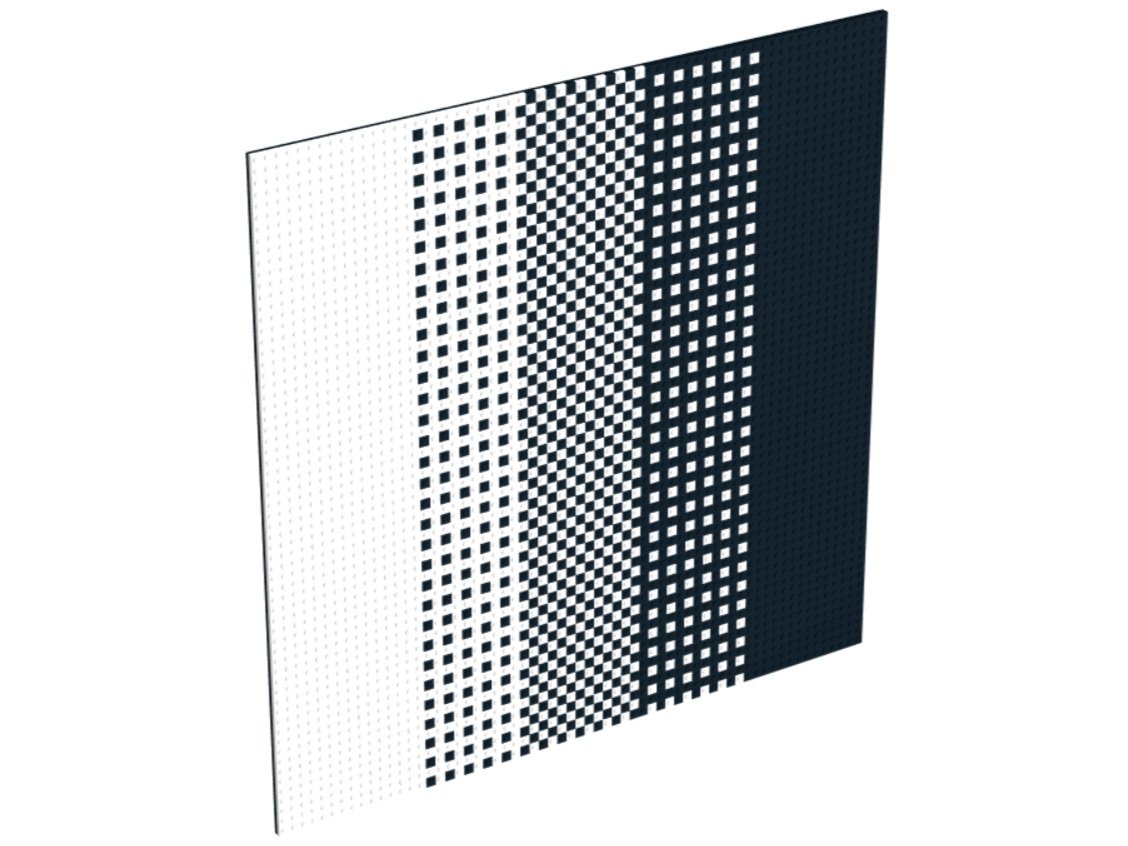
A mosaic made by repeating the five patterns. The three patterns in the middle simulate different shades of gray.
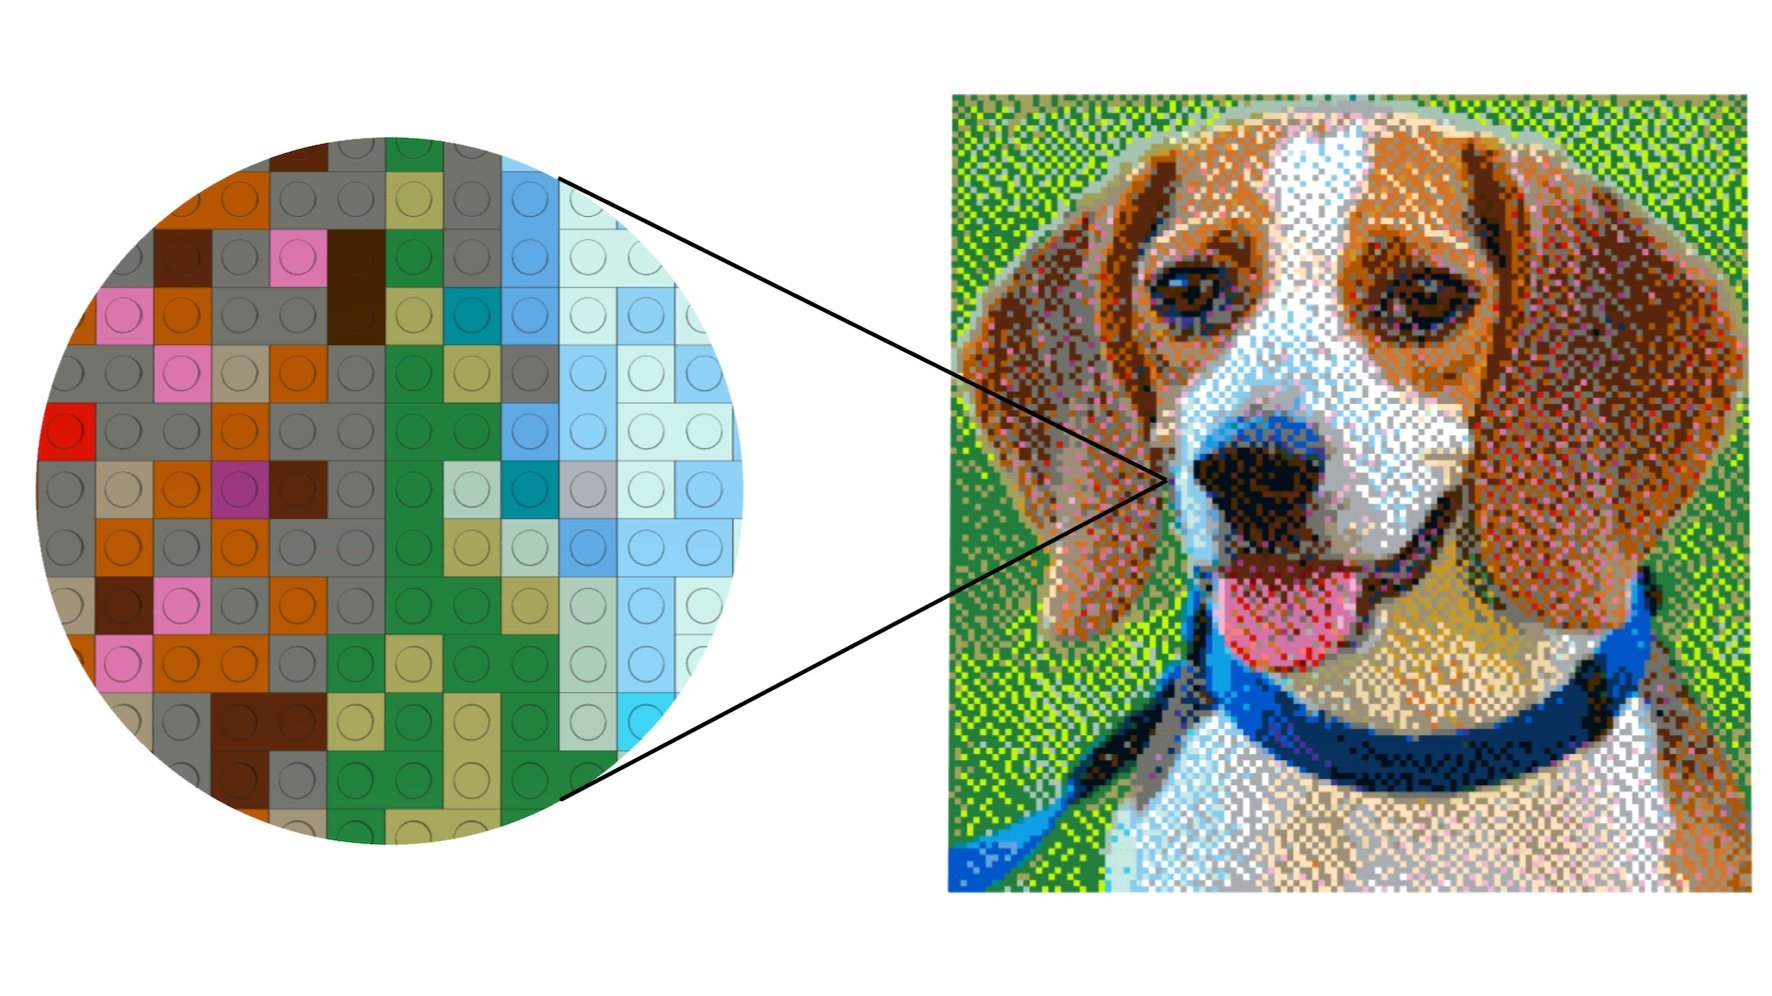
This is a simple illustration of how two base colors (black and white) can be mixed in different proportions to create the illusion of a wider range of colors. Similarly, if the original mosaic image contains colors not in the LEGO palette, dithering can arrange LEGO pieces in the available colors in such a way that they combine in the viewer's mind to create the illusion of seeing the missing colors. This next image shows two mosaics based on the same image: one created without dithering and one with.
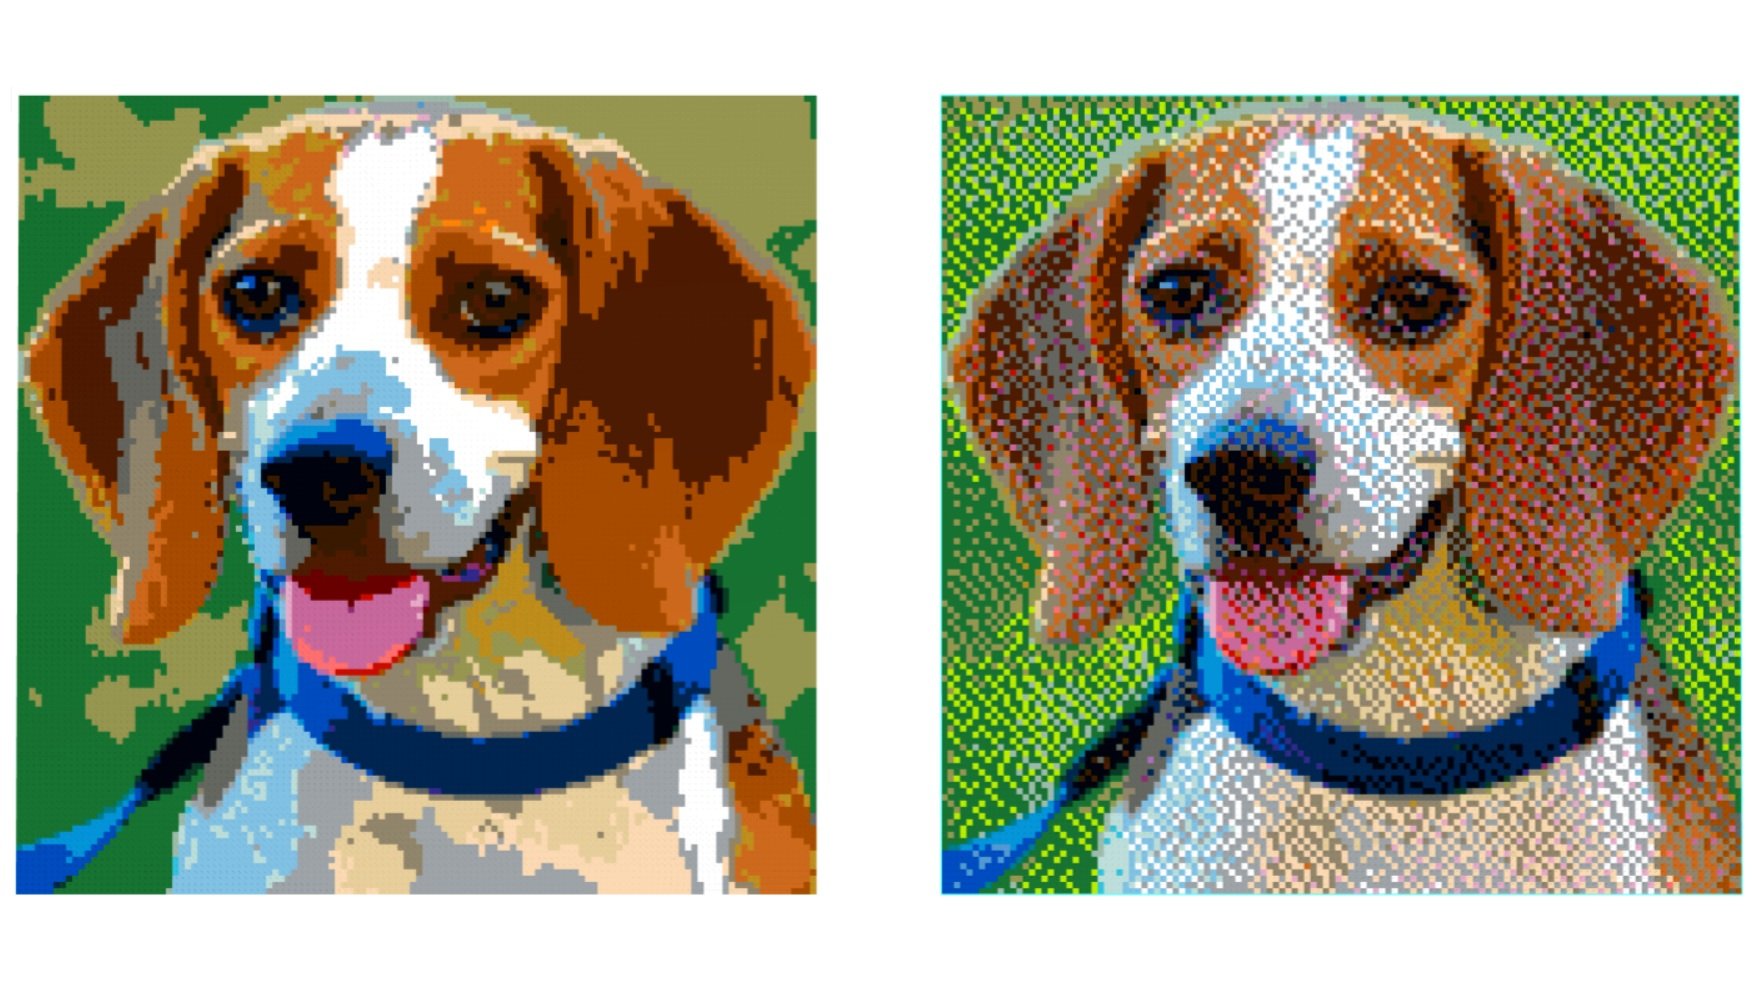
Mosaics based on the same image without (left) and with (right) dithering
Notice how dithering in the version on the right significantly reduces the blotchiness that results from the limited LEGO color palette in the version on the left. Dithering can therefore help to more accurately render subtle color gradations (particularly skin tones in mosaics showing human faces). However, some people find the extra "grain" that dithering adds more distracting than the blotchiness that occurs without dithering. Therefore, whether or not to use dithering is a matter of personal preference.
Step 5: Making the actual mosaic
Once you have scaled the image to the dimensions of the mosaic and assigned the colors to the LEGO color palette, the final step is to create the actual mosaic by digitally laying out the necessary LEGO pieces. If the tool allows it (and you have enabled this option), part optimization can also occur at this stage. This is where adjacent pieces with the same colors are combined into larger pieces, reducing the overall cost of your mosaic (and hopefully making it a little less tedious to build). The output of this step can be a Studio file (BrickLink Studio), an LDraw file, or a list of the pieces needed to build your mosaic in an XML format, along with the instructions in a PDF (LEGO Art Remix will produce the XML and PDF).
Summary
In this article, we've covered the different types of LEGO mosaics and discussed how you can use software tools like BrickLink Studio or LEGO Art Remix to help with the mosaic design process. We've outlined the steps these tools use to convert an image file into a plan for a mosaic that can be built using real pieces.


